CA Deployment steps
Download the binaries
The Fabric CA server and CA client binaries can be downloaded from github. Scroll down to Assets and select the latest binary for your machine type. The .zip file contains both the CA server and the CA client binaries. After you have mastered deploying and running a CA by using these binaries, it is likely you will want to use the Fabric CA image instead, for example in a Kubernetes or Docker deployment. For now though, the purpose of this topic is to teach you how to properly use the binaries.
Server binary file
In this topic, we use the server binaries to deploy three different types of CAs: the TLS CA, an organization CA, and optionally an intermediate CA. The TLS CA issues certificates that secure communicates between all the nodes in the organization. The organization CA issues identity certificates. If you decide to include an intermediate CA, the organization CA serves as the root CA or parent server for the intermediate CA. If you have not already, you should review the topic on Planning for a CA to understand the purpose of each type of CA and their differences. We run the TLS CA, organization CA, and intermediate CAs from different folders. We will copy the CA server binary to each folder.
Client binary file
Likewise, we will copy the Fabric CA client binary to its own directory. Having the CA client in its own folder facilitates certificate management, especially when you need to interact with multiple CAs. When you issue a command from the CA client against a CA server, you can target a specific CA by modifying the CA server URL on the request. Therefore, only a single Fabric CA client binary is required and can be used to transact with multiple CAs. More on using the Fabric CA client below.
Fabric CA client
Before deploying a Fabric CA server, you need to understand the role of the Fabric CA client. While you can use the Fabric SDKs to interact with your CA, it is recommended that you use the Fabric CA client to register and enroll node admin identities. The instructions provided in this topic assume a single Fabric CA client is being used. Registering an identity, or user, is the process by which the enroll id and secret is added to the CA database “user registry”. If you are using LDAP server for your user registry, then the register step is not required because the identities already exist in the LDAP database. After a user is registered you can use the Fabric CA client to “enroll” the identity which is the process that generates the certificates the identity needs to transact as part of the organization. When you submit an enrollment request, the private and public keys are first generated locally by the Fabric CA client, and then the public key is sent to the CA which returns an encoded “signed certificate”.
Because you will use a single CA client to submit register and enrollment requests to multiple CAs, certificate management is critically important when using the CA client. A best practice therefore is to create sub-folders for each CA server that the CA client will interact with, to store the generated certificates.
Create a sub-folder in order to connect to each CA server, such as
/tls-caor/org1-caor/int-ca. This folder can be under the Fabric CA client or anywhere that the CA client can access the path. For purposes of these instructions, these folders reside inside thefabric-ca-clientdirectory. For example:mkdir fabric-ca-client cd fabric-ca-client mkdir tls-ca org1-ca int-ca
Tip: While you can run the Fabric CA client binary from any folder you prefer, for ease of following these instructions we will refer to it in its own directory named
fabric-ca-client.Copy the Fabric CA client binary into the
fabric-ca-clientfolder.Because TLS communications are enabled on a production network, the TLS CA for the organization is responsible for generating certificates that secure communications between all nodes in the organization. Therefore, every time the Fabric CA client transacts with a CA server in that organization, it needs to provide the TLS CA “root certificate” to secure the client-server communication. For example, when the Fabric CA client issues a register or enroll request to the CA server, the client request includes that root certificate to perform an SSL handshake. The TLS CA root certificate, named
ca-cert.pem, is generated on the TLS CA after TLS is enabled in the server config .yaml file. To enable TLS communications for your CA client, you need atls-root-certsub-folder to store the root certificate. Later in this topic, we will copy the root certificate into this folder.mkdir tls-root-cert
The resulting folder structure resembles:
fabric-ca-client
  ├── int-ca
  ├── org1-ca
  ├── tls-ca
  └── tls-root-cert
Important: If your Fabric CA client will transact with CAs from multiple organizations that are secured by different TLS servers, then you would need to either create different tls-root-cert folders to hold the TLS CA root certificate for each organization or simply name them differently inside the folder to differentiate them. Since our Fabric CA client will only be transacting with CA servers in the same organization, all of which are secured by the same TLS CA, we will only have a single root certificate in this folder.
You can use environment variables or flags on the CLI commands to specify the location of certificates and the Fabric CA client binary:
FABRIC_CA_CLIENT_HOME- Specify the fully qualified path to where Fabric CA client binary resides.FABRIC_CA_CLIENT_TLS_CERTFILES- Specify the location and name of the TLS CA root certificate. If the path of the environment variableFABRIC_CA_CLIENT_TLS_CERTFILESis not an absolute path, it will be parsed as relative to the Fabric CA client’s home directory as specified byFABRIC_CA_CLIENT_HOME. Throughout these instructions, we use the--tls.certfilesflag on the commands instead to specify the location of the TLS CA root certificate.FABRIC_CA_CLIENT_MSPDIR- While you can use this environment variable to specify the name of the folder where the certificates are located, because the client communicates with multiple CAs, a better option is to explicitly pass the--mspdirflag on the register and enroll commands to specify the location. If not specified on the command, the location defaults to$FABRIC_CA_CLIENT_HOME/mspwhich will be problematic if the Fabric CA client transacts with multiple CA servers in the organization.
Tip: The first time you issue an enroll command from the CA client, if the fabric-ca-client-config.yaml does not already exist in the $FABRIC_CA_CLIENT_HOME directory, it is generated. When you customize the values in this file, they are used automatically by the CA client and do not have to be passed on the command line on a subsequent enroll command.
The usage of a single Fabric CA client to interact with multiple CA servers is used throughout these instructions but is not necessarily a required pattern. Another alternative is to have a single Fabric CA client for each CA server. In that case, the Fabric CA client connection settings to the server are generated and stored in the fabric-ca-client-config.yaml file when the initial enroll command is issued for the CA server admin.
Submitting transactions from the CLI
Two sets of CLI commands are included with the CA server and CA client binary files:
Use the Fabric CA server CLI commands to deploy and update the CA server.
Use the Fabric CA client CLI commands to submit requests to your CA server after it is set up, such as registering, enrolling or revoking identities.
We will use both of these CLI commands throughout this topic.
What order should I deploy the CAs?
Assuming you are not deploying a dual-headed CA that contains both a TLS CA and an organization CA together, you would deploy the CAs in the following order:
Deploy the TLS CA
Because TLS communication is required in a Production network, TLS must be enabled on each CA, peer, and ordering node. While the example configuration in the CA Operations Guide shares a single TLS CA across all organizations, the recommended configuration for production is to deploy a TLS CA for each organization. The TLS CA issues the TLS certificates that secure communications between all the nodes on the network. Therefore, it needs to be deployed first to generate the TLS certificates for the TLS handshake that occurs between the nodes.
Deploy the organization CA
This is the organization’s identity enrollment CA and is used to register and enroll the identities that will participate in the network from this organization.
Deploy the intermediate CA (Optional)
If you decide to include an intermediate CA in your network, the intermediate CA’s parent server (the associated root CA) must be deployed before any intermediate CAs.
Deploy the TLS CA
Regardless of whether you are setting up a TLS CA, an organization CA or an intermediate CA, the process follows the same overall steps. The differences will be in the modifications you make to the CA server configuration .yaml file. The following steps provide an overview of the process:
When you deploy any node, you have three options for your TLS configuration:
No TLS. Not recommended for a production network.
Server-side TLS.
Mutual TLS.
This process will configure a CA with server-side TLS enabled which is recommended for production networks. Mutual TLS is disabled by default. If you need to use mutual TLS, refer to the TLS configuration settings.
Before you begin
You should have already downloaded and copied the Fabric CA server binary fabric-ca-server to a clean directory on your machine. For purposes of these instructions, we put the binary in its own folder named fabric-ca-server-tls.
mkdir fabric-ca-server-tls
Copy the fabric-ca-server binary into this folder.
Initialize the TLS CA server
The first step to deploy a CA server is to “initialize” it. Run the following CA server CLI command to initialize the server by specifying the admin user id and password for the CA:
./fabric-ca-server init -b <ADMIN_USER>:<ADMIN_PWD>
For example:
cd fabric-ca-server-tls
./fabric-ca-server init -b tls-admin:tls-adminpw
The -b (bootstrap identity) flag bootstraps the admin username and password to the CA server which effectively “registers” the CA admin user with the server for you, so an explicit Fabric CA client CLI register command is not required for the bootstrapped user. All CA users need to be “registered” and then “enrolled” with the CA, except for this CA admin identity which is implicitly registered by using the -b flag. The registration process inserts the user into the CA database. The -b option is not required for initialization when LDAP will be configured.
Note: This example is for illustration purposes only. Obviously, in a production environment you would never use tls-admin and tls-adminpw as the bootstrap username and password. Be sure that you record the admin id and password that you specify. They are required later when you issue register and enroll commands against the CA. It can help to use a meaningful id to differentiate which server you are transacting with and follow secure password practices.
What does the CA server init command do?
The init command does not actually start the server but generates the required metadata if it does not already exist for the server:
Sets the default the CA Home directory (referred to as
FABRIC_CA_HOMEin these instructions) to where thefabric-ca-server initcommand is run.Generates the default configuration file
fabric-ca-server-config.yamlthat is used as a template for your server configuration in theFABRIC_CA_HOMEdirectory. We refer to this file throughout these instructions as the “configuration .yaml” file.Creates the TLS CA root signed certificate file
ca-cert.pem, if it does not already exist in the CA Home directory. This is the self-signed root certificate, meaning it is generated and signed by the TLS CA itself and does not come from another source. This certificate is the public key that must be shared with all clients that want to transact with any node in the organization. When any client or node submits a transaction to another node, it must include this certificate as part of the transaction.Generates the CA server private key and stores it in the
FABRIC_CA_HOMEdirectory under/msp/keystore.Initializes a default SQLite database for the server although you can modify the database setting in the configuration .yaml file to use the supported database of your choice. Every time the server is started, it loads the data from this database. If you later switch to a different database such as PostgreSQL or MySQL, and the identities defined in the
registry.identitessection of the configuration .yaml file don’t exist in that database, they will be registered.Bootstraps the CA server administrator, specified by the
-bflag parameters<ADMIN_USER>and<ADMIN_PWD>, onto the server. When the CA server is subsequently started, the admin user is registered with the admin attributes provided in the configuration .yaml fileregistrysection. If this CA will be used to register other users with any of those attributes, then the CA admin user needs to possess those attributes. In other words, the registrar must have thehf.Registrar.Rolesattributes before it can register another identity with any of those attributes. Therefore, if this CA admin will be used to register the admin identity for an Intermediate CA, then this CA admin must have thehf.IntermediateCAset totrueeven though this may not be an intermediate CA server. The default settings already include these attributes.
Important: When you modify settings in the configuration .yaml file and restart the server, the previously issued certificates are not replaced. If you want the certificates to be regenerated when the server is started, you need to delete them and run the fabric-ca-server start command. For example, if you modify the csr values after you start the server, you need to delete the previously generated certificates, and then run the fabric-ca-server start command. Be aware though, that when you restart the CA server using the new signed certificate and private key, all previously issued certificates will no longer be able to authenticate with the CA.
Modify the TLS CA server configuration
Now that you have initialized your server, you can edit the generated fabric-ca-server-config.yaml file to modify the default configuration settings for your use case according to the Checklist for a production CA server.
At a minimum you should do the following:
port- Enter the port that you want to use for this server. These instructions use7054, but you can choose your port.tls.enabled- Recall that TLS is disabled in the default configuration file. Since this is a production server, enable it by setting this value totrue. Setting this value totruecauses the TLS signed certificatetls-cert.pemfile to be generated when the server is started in the next step. Thetls-cert.pemis the certificate the server will present to the client during a TLS handshake, which the client will then verify using the TLS CA’sca-cert.pem.ca.name- Give the CA a name by editing the parameter, for exampletls-ca.csr.hosts- Update this parameter to include a hostname, ip address, or domain name where this server is running, if it is different than what is already in this file. The host/domain names will be used to specify Subject Alternative Names when the server creates its self-signed TLS certificate tls-cert.pem when you start the server in the next step.signing.profiles.ca- Since this is a TLS CA that will not issue CA certificates, thecaprofiles section can be removed. Thesigning.profilesblock should only containtlsprofile.operations.listenAddress:- In the unlikely case that there is another node running on this host and port, then you need to update this parameter to use a different port.
Delete the TLS CA server certificates
Before starting the server, if you modified any of the values in the csr block of the configuration .yaml file, you need to delete the fabric-ca-server-tls/ca-cert.pem file and the entire fabric-ca-server-tls/msp folder. These certificates will be re-generated when you start the CA server in the next step.
Start the TLS CA server
Run the following command to start the CA server:
./fabric-ca-server start
When the server starts successfully you will see something similar to:
[INFO] Listening on https://0.0.0.0:7054
Because you have enabled TLS communications but have not specified a TLS certfile, notice that the TLS signed certificate tls-cert.pem file is generated under the FABRIC_CA_HOME location.
Tip: The CA ADMIN_USER and ADMIN_PWD that were set on the init command cannot be overridden with the -b flag on this start command. When you need to modify the CA admin password, use the Fabric CA client identity command.
Optional flags:
-d- If you want to run the server in DEBUG mode which facilitates problem diagnosis, you can include the-dflag on the start command. However, in general it is not recommended to run a server with debug enabled as this will cause the server to perform slower.-p- If you want the server to run on a port different than what is specified in the configuration .yaml file, you can override the existing port.
Enroll bootstrap admin identity with TLS CA
Now that your TLS CA is configured and before you can deploy any other nodes for your organization, you need to enroll the bootstrap admin identity of the TLS CA. Since the CA server is up and running, instead of using the Fabric CA server CLI commands we now use the Fabric CA client CLI commands to submit an enrollment request to the TLS CA server.
Performed by using the Fabric CA client, the enrollment process is used to generate the certificate and private key pair which forms the TLS CA bootstrap admin identity. You should have already setup the required folders in the Fabric CA client section.
The folder structure that we are using for these Fabric CA client commands is:
fabric-ca-client
  └── tls-ca
  └── tls-root-cert
These folders are used by the Fabric CA client to:
Store the certificates that are issued when the Fabric CA client enroll command is run against the TLS CA server to enroll the TLS CA bootstrap admin identity. (tls-ca folder)
Know where the TLS CA root certificate resides that allows the Fabric CA client to communicate with the TLS CA server. (tls-root-cert folder)
Copy the TLS CA root certificate file
fabric-ca-server-tls/ca-cert.pem, that was generated when the TLS CA server was started, to thefabric-ca-client/tls-root-cert/tls-ca-cert.pemfolder. Notice the file name is changed totls-ca-cert.pemto make it clear this is the root certificate from the TLS CA. Important: This TLS CA root certificate will need to be available on each client system that will run commands against the TLS CA.The Fabric CA Client also needs to know where Fabric CA client binary is located. The
FABRIC_CA_CLIENT_HOMEenvironment variable is used to set the location.export FABRIC_CA_CLIENT_HOME=<FULLY-QUALIFIED-PATH-TO-FABRIC-CA-BINARY>
For example, if you are in the
fabric-ca-clientfolder you can use:export FABRIC_CA_CLIENT_HOME=$PWD
You are ready to use the Fabric CA client CLI to enroll the TLS CA bootstrap admin identity. Run the command:
./fabric-ca-client enroll -d -u https://<ADMIN>:<ADMIN-PWD>@<CA-URL>:<PORT> --tls.certfiles <RELATIVE-PATH-TO-TLS-CERT> --enrollment.profile tls --mspdir tls-ca/tlsadmin/msp
Replace:
<ADMIN>- with the TLS CA admin specified on theinitcommand.<ADMIN-PWD>- with the TLS CA admin password specified on theinitcommand.<CA-URL>- with the hostname specified in thecsrsection of the TLS CA configuration .yaml file.<PORT>- with the port that the TLS CA is listening on.<RELATIVE-PATH-TO-TLS-CERT>- with the path and name of the root TLS certificate file that you copied from your TLS CA. This path is relative toFABRIC_CA_CLIENT_HOME. If you are following the folder structure in this tutorial it would betls-root-cert/tls-ca-cert.pem.
For example:
./fabric-ca-client enroll -d -u https://tls-admin:tls-adminpw@my-machine.example.com:7054 --tls.certfiles tls-root-cert/tls-ca-cert.pem --enrollment.profile tls --mspdir tls-ca/tlsadmin/msp
In this case, the
-dparameter runs the client in DEBUG mode which is useful for debugging enrollment failures.Notice the
--mspdirflag is used on the command to designate where to store the TLS CA admin certificates that are generated by the enroll command.The
--enrollment.profile tlsflag is specified because we are enrolling against the TLS CA. Use of this flag means that the enrollment is performed according to theusageandexpirysettings of the TLS profile that is defined in thesigningsection of the configuration .yaml file. Note: If you removed thesigning.profiles.cablock from the TLS CA configuration .yaml file, you could omit the--enrollment.profile tlsflag.When this command completes successfully, the
fabric-ca-client/tls-ca/tlsadmin/mspfolder is generated and contains the signed cert and private key for the TLS CA bootstrap admin identity. If the enroll command fails for some reason, to avoid confusion later, you should remove the generated private key from thefabric-ca-client/tls-ca/admin/msp/keystorefolder before reattempting the enroll command. We will reference this crypto material later when it is required to register other identities with the TLS CA.Tip: After you issue this first
enrollcommand from the Fabric CA client, examine the contents of the generatedfabric-ca-client/fabric-ca-client-config.yamlfile to become familiar with the default settings that are used by the Fabric CA client. Because we are using a single Fabric CA client to interact with multiple CA servers, we need to use the-uflags on the client CLI commands to target the correct CA server. In conjunction, the--mspdirflag indicates the location of the cryptographic material to use on aregistercommand or where to store the generated certificates on anenrollcommand.
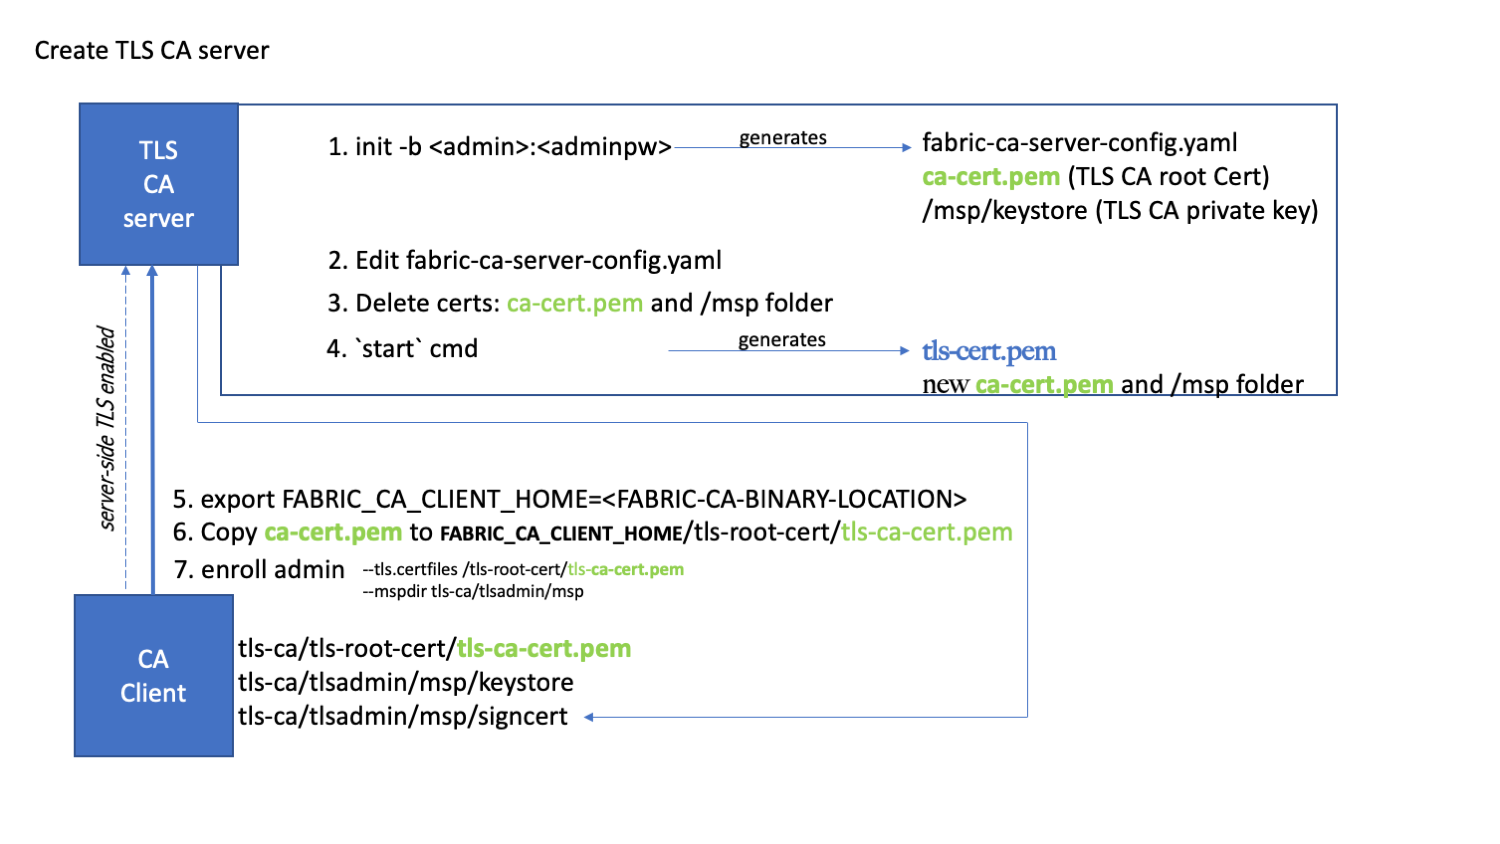
The following diagram is a conceptual summary of the steps you perform to create a TLS CA server and enroll the bootstrap admin identity using the Fabric CA client:
Register and enroll the organization CA bootstrap identity with the TLS CA
The TLS CA server was started with a bootstrap admin identity (tlsadmin) which has full admin privileges for the server. One of the key abilities of the admin is the ability to register new identities. Each node in the organization (orderers, peers, organization CAs) that will transact on the network needs to be registered with the TLS CA, so that each node can then enroll to get their TLS certificate. Therefore, before we set up the organization CA, we need to use the TLS CA to register and enroll the organization CA bootstrap identity to get its TLS certificate and private key. The organization CA bootstrap admin user will be named rcaadmin in the next step, therefore we will generate the TLS identity for the organization CA using the same name. The following command registers the organization CA bootstrap identity rcaadmin with password rcaadminpw with the TLS CA.
./fabric-ca-client register -d --id.name rcaadmin --id.secret rcaadminpw -u https://my-machine.example.com:7054 --tls.certfiles tls-root-cert/tls-ca-cert.pem --mspdir tls-ca/tlsadmin/msp
Notice that the --mspdir flag on the command points to the location of TLS CA admin msp certificates that we generated in the previous step. This crypto material is required to be able to register nodes with the TLS CA.
Next, we need to enroll the rcaadmin identity to the TLS CA to generate the TLS certificates for the organization CA server. In this case, we use the --mspdir flag on the enroll command to designate where the generated organization CA TLS certificates should be stored for the rcaadmin identity. Because these certificates are for a different identity, it is a best practice to put them in their own folder. Therefore, instead of generating them in the default msp folder, we will put them in a new folder named rcaadmin that resides along side the tlsadmin folder. Also note that because we are generating a TLS certificate, we must pass --csr.hosts to specify the Subject Alternative Name (SAN) in the generated TLS certificate. The host names (or domain names) must match the host names (or domain names) that clients will use when communicating to the organization CA server in order for the TLS handshake to succeed. For multiple names, use a comma-separated list with no spaces.
./fabric-ca-client enroll -d -u https://rcaadmin:rcaadminpw@my-machine.example.com:7054 --tls.certfiles tls-root-cert/tls-ca-cert.pem --enrollment.profile tls --csr.hosts 'host1,*.example.com' --mspdir tls-ca/rcaadmin/msp
In this case, the --mspdir flag works a little differently. For the enroll command, the --mspdir flag indicates where to store the generated TLS certificates for the rcaadmin identity.
Important: The organization CA TLS signed certificate is generated under fabric-ca-client/tls-ca/rcaadmin/msp/signcert and the private key is available under fabric-ca-client/tls-ca/rcaadmin/msp/keystore. When you deploy the organization CA in the next step you will need to copy these files under the organization CA directory and reference them in the tls section of the organization CA configuration .yaml file. For ease of reference, you can rename the file in the keystore folder to key.pem.
(Optional) Register and enroll the Intermediate CA admin with the TLS CA
Similarly, if you are planning to have an intermediate CA that can issue certificates on behalf of the organization CA, you should also register and enroll the intermediate CA admin user now as well. The following command registers the intermediate CA admin id icaadmin and icaadminpw with the TLS CA. You can use any values you choose for the identity name and password.
./fabric-ca-client register -d --id.name icaadmin --id.secret icaadminpw -u https://my-machine.example.com:7054 --tls.certfiles tls-root-cert/tls-ca-cert.pem --mspdir tls-ca/tlsadmin/msp
Again, the --mspdir flag on the register command points to the location of TLS CA admin msp certificates that are required to be able to register other users with the TLS CA.
Now would also be a good time to generate the intermediate CA TLS certificates for the icaadmin user by enrolling the user. For the enroll command, we use the --mspdir flag to designate where the generated intermediate CA TLS certificates should be stored for the icaadmin user. In this case we put them into a new folder named icaadmin/msp along side the tlsadmin folder.
./fabric-ca-client enroll -d -u https://icaadmin:icaadminpw@my-machine.example.com:7054 --tls.certfiles tls-root-cert/tls-ca-cert.pem --enrollment.profile tls --csr.hosts 'host1,*.example.com' --mspdir tls-ca/icaadmin/msp
Important: The intermediate CA TLS signed certificate is generated under fabric-ca-client/tls-ca/icaadmin/signcert and the private key is available under fabric-ca-client/tls-ca/icaadmin/keystore. When you deploy the intermediate CA you will need to refer to these two files in the tls section of the intermediate CA configuration .yaml file. For ease of reference you can rename the file in the keystore folder to key.pem.
The resulting folder structure resembles:
fabric-ca-client
  └── tls-ca
    └── tlsadmin
      └── msp
    └── rcaadmin
      └── msp
    └── icaadmin
      └── msp
    └── tls-root-cert
      └── tls-ca-cert.pem
Tip: After you have registered all your nodes with the TLS CA, it can be safely turned off.
Deploy an organization CA
The deployment process overview describes the need for both an organization CA and a TLS CA for every organization. The TLS CA issues the TLS certificates that allow for secure transactions within the organization. The organization CA, also referred to as the “enrollment CA” or the “eCert CA” is used to issue identities for the organization. You deployed the TLS CA in the previous set of steps, now we are ready to deploy the organization CA. Later in this topic you can optionally create an intermediate CA; therefore, this CA serves as the “root CA” in that chain of trust.
Because you’ve already registered and enrolled your organization CA bootstrap identity rcaadmin with the TLS CA in the previous step, you already have the TLS certificate for the organization CA and you are ready to deploy the organization CA following the same pattern of steps that were used when you deployed the TLS CA.
Before you begin
Copy the Fabric CA server binary
fabric-ca-serverto a new directory on your machine. For purposes of these instructions, we put the binary in its own folder namedfabric-ca-server-org1.mkdir fabric-ca-server-org1
Now, copy the
fabric-ca-serverbinary into this folder.Using the following commands, copy the organization CA TLS certificate and key pair that you generated in the previous step to a location that can be accessed by this CA server, for example
fabric-ca-server-org1/tls. These are thefabric-ca-client/tls-ca/rcaadmin/msp/signcerts/cert.pemandfabric-ca-client/tls-ca/rcaadmin/msp/keystore/files that were generated by the enroll command.Note: The following commands assume that:
The generated private key under
fabric-ca-client/tls-ca/rcaadmin/msp/keystore/was renamed tokey.pem.The
fabric-ca-clientandfabric-ca-server-org1folders are at the same level in your file structure.
cd fabric-ca-server-org1
mkdir tls
cp ../fabric-ca-client/tls-ca/rcaadmin/msp/signcerts/cert.pem tls && cp ../fabric-ca-client/tls-ca/rcaadmin/msp/keystore/key.pem tls
The resulting folder structure is similar to the following diagram. (Some folders and files have been omitted for clarity):
fabric-ca-client
  └── tls-ca
        ├── rcaadmin
          ├── msp
             ├── IssuerPublicKey
             ├── IssuerRevocationPublicKey
             ├── cacerts
             ├── keystore
                 └── key.pem
             ├── signcerts
                 └── cert.pem
fabric-ca-server-org1
  └── tls
    └── cert.pem
    └── key.pem
Initialize the CA server
Run the command to initialize the server, specifying a new admin user id and password for the CA. We use the same identity rcaadmin that we registered with the TLS CA in the previous set of steps as the bootstrap identity of the organization CA. Run this command from the fabric-ca-server-org1 folder.
./fabric-ca-server init -b <ADMIN_USER>:<ADMIN_PWD>
For example:
./fabric-ca-server init -b rcaadmin:rcaadminpw
Modify the CA server configuration
As we did with the TLS CA, we need to edit the generated fabric-ca-server-config.yaml file for the organization CA to modify the default configuration settings for your use case according to the Checklist for a production CA server.
At a minimum, you should edit the following fields:
port- Enter the port that you want to use for this server. These instructions use7055, but you can choose your port.tls.enabled- Enable TLS by setting this value totrue.tls.certfileandtls.keystore- Enter the relative path and filenames for the TLS CA signed certificate and private key that were generated when the bootstrap admin for this CA was enrolled with the TLS CA. The signed certificate,cert.pem, was generated using the Fabric CA client and can be found underfabric-ca-client/tls-ca/rcaadmin/msp/signcerts/cert.pem. The private key is located underfabric-ca-client/tls-ca/rcaadmin/msp/keystore. The specified path name is relative toFABRIC_CA_CLIENT_HOMEtherefore if you are following the folder structure that is used throughout these instructions you can simply specifytls/cert.pemfor thetls.certfileandtls/key.pemfor thetls.keystoreor you can specify the fully qualified path name.ca.name- Give the organization CA a name by specifying a value in this parameter, for exampleorg1-ca.csr.hosts- Typically this parameter should be the hostname, ip address, or domain name where this server is running so that it can be injected into the TLS certificate Subject Alternative Name, however in this case the server will not generate its own TLS certificate (it was generated already from the TLS CA) and therefore no configuration is needed.csr.ca.pathlength: This field is used to limit CA certificate hierarchy. Setting this value to1for the root CA means the root CA can issue intermediate CA certificates, but these intermediate CAs cannot in turn issue other CA certificates. In other words the intermediate CA cannot enroll other intermediate CAs, but it can issue enrollment certificates for users. The default value is1.signing.profiles.ca.caconstraint.maxpathlen- This field represents the maximum number of non-self-issued intermediate certificates that can follow this certificate in a certificate chain. If this will be a parent server for an intermediate CA, and you want that intermediate CA to act as a parent CA for another intermediate CA, this root CA needs to set this value to greater than 0 in the configuration .yaml file. See the instructions for the signing section. The default value is0.operations.listenAddress:- If there is another CA running on this host, then you need to update this parameter to use a different port.
Delete the CA server certificates
Before starting the server, if you modified any of the values in the csr block of the configuration .yaml file, you need to delete the fabric-ca-server-org1/ca-cert.pem file and the entire fabric-ca-server-org1/msp folder. These certificates will be re-generated based on the new settings in the configuration .yaml file when you start the CA server in the next step.
Start the CA server
Run the following command to start the CA server:
./fabric-ca-server start
Enroll the CA admin
The final step for deploying the CA is to enroll the CA admin bootstrap identity (rcaadmin user). This will generate the rcaadmin user’s signed certificate and private key. The key-pair is required so that the rcaadmin user can then register and enroll other identities in the organization. Again we will use the Fabric CA client CLI to enroll the admin. You should have already setup the required folders in the Fabric CA client section.
The folder structure we are using for these commands is:
fabric-ca-client
  └── org1-ca
  └── tls-root-cert
These folders are used by the Fabric CA client to:
Store the certificates that are issued when the Fabric CA client enroll command is run against the organization CA server. (org1-ca folder)
Know where the TLS certificate resides that allows the Fabric CA client to communicate with the TLS CA server. (tls-root-cert folder)
When you previously used the Fabric CA client to generate certificates for the TLS CA, you designated the value of the
FABRIC_CA_CLIENT_HOME. Assuming that is still set you can proceed to the next step. Otherwise, you should be in the directory where the Fabric CA client binary resides and run the command:export FABRIC_CA_CLIENT_HOME=$PWD
Now you can use the Fabric CA client to generate the CA admin certificate and private key. You need this certificate and private key to be able to issue identities using this CA. We use the
--mspdirflag on the enroll command to designate where to store the generated certificates. Run the command:./fabric-ca-client enroll -d -u https://<ADMIN>:<ADMIN-PWD>@<CA-URL>:<PORT> --tls.certfiles <RELATIVE-PATH-TO-TLS-CERT> --mspdir org1-ca/rcaadmin/msp
Replace:
<ADMIN>- with the organization CA admin specified on theinitcommand.<ADMIN-PWD>- with the organization CA admin password specified on theinitcommand.<CA-URL>- with the hostname for the organization CA.<PORT>- with the port that the organization CA is listening on.<RELATIVE-PATH-TO-TLS-CERT>- with the path to the tls-ca-cert.pem file that you copied from your TLS CA. This is the path relative toFABRIC_CA_CLIENT_HOME.
In this case, the
-dparameter runs the client in DEBUG mode which is useful for debugging command failures.For example:
./fabric-ca-client enroll -d -u https://rcaadmin:rcaadminpw@my-machine.example.com:7055 --tls.certfiles tls-root-cert/tls-ca-cert.pem --mspdir org1-ca/rcaadmin/msp
When this command runs, the enroll command creates the
fabric-ca-client/org1-ca/rcaadmin/mspfolder and contains the signed cert and private key for the organization CA and looks similar to:└── msp ├── cacerts └── my-machine-example-com-7055.pem ├── keystore └── 60b6a16b8b5ba3fc3113c522cce86a724d7eb92d6c3961cfd9afbd27bf11c37f_sk ├── signcerts └── cert.pem ├── user ├── IssuerPublicKey └── IssuerRevocationPublicKeyWhere:
my-machine-example-com-7055.pemis the Organization CA root certificate.60b6a16b8b5ba3fc3113c522cce86a724d7eb92d6c3961cfd9afbd27bf11c37f_skis the private key for the organization CA admin identity. This key needs to be protected and should not be shared with anyone. It is required to be able to register and enroll other identities with this CA. Feel free to rename this file to something easier to reference, for exampleorg1-key.pem.cert.pemis the CA admin identity signed certificate.
(Optional) Register the intermediate CA bootstrap identity with the organization (root) CA.
If you plan to deploy an intermediate CA, you must register the intermediate CA bootstrap identity with its root CA in order to form the chain of trust. Recall that you already registered the
icaadminidentity with the TLS CA. You also need to register the same identity with the (root) organization CA. And because this will be an intermediate CA, you must include thehf.IntermediateCA=trueattribute. (Run this command from the same terminal window where you enrolled the organization CA admin in the previous step.)./fabric-ca-client register -u https://my-machine.example.com:7055 --id.name icaadmin --id.secret icaadminpw --id.attrs '"hf.Registrar.Roles=user,admin","hf.Revoker=true","hf.IntermediateCA=true"' --tls.certfiles tls-root-cert/tls-ca-cert.pem --mspdir org1-ca/rcaadmin/msp
The
--mspdirflag on the register command points to the crypto material for the organization CA admin that we enrolled in the previous step and is authorized to register new users. We don’t enroll theicaadminidentity with the organization CA. Rather this intermediate CA admin identity is enrolled later against the intermediate CA.
(Optional) Deploy an intermediate CA
Intermediate CAs form a chain a trust with the organization root CA and can be used to direct enrollment requests for a specific organization to a single CA as well as protect the root of trust by shutting down the root CA. Thus, when intermediate CAs are used to process all of the enrollment requests, the root CA can be turned off.
Note: This section assumes that you have already registered and enrolled the icaadmin identity with the TLS CA as well as the parent organization CA (step 3 immediately preceding this section).
Before you begin
Copy the Fabric CA server binary
fabric-ca-serverto a new directory on your machine. For purposes of these instructions, we put the binary in its own folder namedfabric-ca-server-int-ca.mkdir fabric-ca-server-int-ca
Copy the
fabric-ca-serverbinary into this folder.Use the following commands to copy the CA admin TLS certificate and key pair that you generated in the previous step to a location that can be accessed by this CA server, for example
fabric-ca-server-int-ca/tls. These are thefabric-ca-client/tls-ca/icaadmin/msp/signcerts/cert.pemandfabric-ca-client/tls-ca/icaadmin/msp/keystore/files that were generated by the enroll command.Note: The following commands assume that:
The generated private key under
fabric-ca-client/tls-ca/icaadmin/keystore/is renamed tokey.pem.The
fabric-ca-clientandfabric-ca-server-int-cafolders are at the same level in your file structure.
cd fabric-ca-server-int-ca
mkdir tls
cp ../fabric-ca-client/tls-ca/icaadmin/msp/signcerts/cert.pem tls && cp ../fabric-ca-client/tls-ca/icaadmin/msp/keystore/key.pem tls
Because TLS communications are enabled, the intermediate CA needs the TLS CA root certificate to be able to securely communicate with the parent organization CA. Therefore, you need to copy the
fabric-ca-server-tls/ca-cert.pem, that was generated when the TLS CA server was initialized, to thetlsfolder. Notice the file name is changed totls-ca-cert.pemto make it clear this is the root certificate from the TLS CA.cp ../fabric-ca-server-tls/ca-cert.pem tls/tls-ca-cert.pem
The resulting folder structure is similar to the following structure. (Some folders and files have been omitted for clarity):
fabric-ca-client
  └── tls-ca
        ├── icaadmin
          ├── msp
             ├── cacerts
             ├── keystore
                 └── key.pem
             ├── signcerts
                 └── cert.pem
             ├── tlscacerts
             ├── user
             ├── IssuerPublicKey
             └── IssuerRevocationPublicKey
fabric-ca-server-int-ca
  └── tls
    └── tls-ca-cert.pem
    └── cert.pem
    └── key.pem
Because you have already deployed the parent organization (root) CA, you can use the following steps to create the intermediate CA:
From the intermediate CA home directory, initialize the CA by running the
initcommand and bootstrapping theicaadminid that you already registered with the TLS CA and parent organization CA. For example:./fabric-ca-server init -b icaadmin:icaadminpw
Modify the
fabric-ca-server-config.yamlfile.port: Specify a unique port for this server. These instructions use7056, but you can choose your port.tls.enabled: Must be set totrue.tls.certfileandtls.keystore: Enter the path and filename for the TLS CA signed certificate and private key. These are the certificate and private key files that you created when you enrolled theicaadminuser with the TLS CA. The signed certificate,cert.pemcan be found underfabric-ca-client/tls-ca/icaadmin/msp/signcerts/cert.pem. The private key is located underfabric-ca-client/tls-ca/icaadmin/msp/keystore. The specified path name is relative toFABRIC_CA_CLIENT_HOMEtherefore if you are following the folder structure that is used throughout these instructions you can simply specifytls/cert.pemfor thetls.certfileandtls/key.pemfor thetls.keystoreor you can specify the fully qualified path name.ca: Specify a name for the ca. For exampleica.signing.profiles.ca.caconstraint.maxpathlen: Set this value to 0, meaning there are no more intermediate CA’s under this one. The default value is0.csr.cn: The common name must be blank for intermediate CAs.csr.ca.pathlength: Set this value to 0.intermediate.parentserver.url: Enter the value of the parent server URL, in the formhttps://<ROOT-CA-ADMIN>:<ROOT-CA-ADMIN-PW>@<CA-URL>:<PORT>, for examplehttps://rcaadmin:rcaadminpw@my-machine.example.com:7055.intermediate.parentserver.caname: Enter the value of the parent servercanamefrom the parent organization CA server configuration .yaml file. In this tutorial, we named that CA,org1-ca.intermediate.enrollment.hosts: Enter the host name that the intermediate CA server is listening on.intermediate.enrollment.profile: Enter the name of the signing profile fromsigning.profilesection to use when issuing certificates. Normally this value isca.intermediate.tls.certfiles: Enter the path and file name to the TLS CA roottls-ca-cert.pemfile. If you are following the folder structure that is used throughout these instructions you can simply specifytls/tls-ca-cert.pem.operations.listenAddress: If another CA is running on the same host, you need to specify a unique port.
Important: You must delete the intermediate CA
fabric-ca-server-int-ca/ca-cert.pemandfabric-ca-server-int-ca/mspfolders in order for them to be regenerated with the intermediate CA settings.Start the intermediate CA server. Because the intermediate CA bootstrap identity is enrolled with the parent organization (root) CA when the server is started, ensure that the parent organziation CA is running before you start the intermediate CA.
./fabric-ca-server start
As this is an intermediate CA server, notice that a
ca-chain.pemfile is generated. This file contains the certificate chain, and includes the intermediate CAca-cert.pemas well as the root CAca-cert.pem.
Enroll the Intermediate CA admin
The final step for deploying the intermediate CA is to enroll the intermediate CA admin to generate the node signed certificate and private key which is required for the identity to be able to enroll other identities. You should have already setup the required folders in the Fabric CA client section.
The folder structure we are using for these commands is
fabric-ca-client
  └── int-ca
  └── tls-root-cert
These folders are used by the Fabric CA client to:
Store the certificates that are issued when the Fabric CA client enroll command is run against the TLS CA server. (int-ca folder)
Know where the TLS certificate resides that allows the Fabric CA client to communicate with the TLS CA server. (tls-root-cert folder)
When you previously used the Fabric CA client to generate certificates for the TLS CA and organization CA, you designated the value of the
FABRIC_CA_CLIENT_HOME. Assuming that is still set, you can proceed to the next step. Otherwise, you should be in the directory where the Fabric CA client binary resides and run the command:export FABRIC_CA_CLIENT_HOME=$PWD
Now you can use the Fabric CA client to generate the CA admin certificate and private key. You need this certificate and private key to be able to issue identities using this CA. We use the
--mspdirflag on the enroll command to designate where to store the generated certificates. Run the command:
./fabric-ca-client enroll -d -u https://<ADMIN>:<ADMIN-PWD>@<CA-URL>:<PORT> --tls.certfiles <RELATIVE-PATH-TO-TLS-CERT> --csr.hosts '<CA_HOSTNAME>' --mspdir int-ca/icaadmin/msp
Replace:
<ADMIN>- with the intermediate CA admin specified on theinitcommand.<ADMIN-PWD>- with the intermediate CA admin password specified on theinitcommand.<CA-URL>- with the hostname specified in thecsrsection of the intermediate CA configuration .yaml file.<PORT>- with the port that the intermediate CA is listening on.<RELATIVE-PATH-TO-TLS-CERT>- with the path to the tls-ca-cert.pem file that you copied from your TLS CA. This is the path relative toFABRIC_CA_CLIENT_HOME.<CA_HOSTNAME>- with a comma-separated list of host names for which the certificate should be valid. If not specified, the default value from thefabric-ca-client-config.yamlis used. If a host name is dynamic you can specify a wildcard for the domain. For example, when you include the flag--csr.hosts 'host1,*.example.com'it means that the hostnamehost1is recognized as well as any host from theexample.comdomain.
For example:
./fabric-ca-client enroll -d -u https://icaadmin:icaadminpw@my-machine.example.com:7056 --tls.certfiles tls-root-cert/tls-ca-cert.pem --csr.hosts 'host1,*.example.com' --mspdir int-ca/icaadmin/msp
When the enroll command runs, it creates the fabric-ca-client/int-ca/icaadmin/msp folder and contains the signed cert and private key for the intermediate CA. Notice the /intermediatecerts folder is also created and populated with the intermediate CA certificate which connects this intermediate CA to the root CA.
Tip: After the intermediate CA is successfully deployed and you can register and enroll identities, then you can safely turn off the parent server root CA, the organization CA.
Next steps
Minimally, you should now have a TLS CA and an organization CA configured for your organization. You can now use the Fabric CA client to register and enroll node admin identities, node identities, and organization identities with the TLS CA to generate their TLS certificates required for server side TLS communications. Likewise you will also need to register and enroll the same node admins and users with the organization CA to generate their enrollment certificates and MSPs. See Use the CA to create identities and MSPs for more information. If you did configure an intermediate CA, you can now use that CA to register and enroll identities for the organization instead of the root CA.
Tip: When you subsequently use the Fabric CA client to register identities with the intermediate CA, ensure that you specify the --mspdir int-ca/icaadmin/msp on the register command.
Troubleshooting CA Deployment
Fabric CA client enroll command fails
Problem: When running an enroll command with the Fabric CA client CLI, it fails with:
Error: Failed to read config file at '/Users/mwp/.fabric-ca-client/fabric-ca-client-config.yaml': While parsing config: yaml: line 42: mapping values are not allowed in this context
Solution:
This error occurs when the FABRIC_CA_CLIENT_HOME is not set. Ensure that you have set the FABRIC_CA_CLIENT_HOME environment variable to point to the location of the Fabric CA client binary. Navigate to the folder where the fabric-ca-client.exe binary file resides and run the command:
export FABRIC_CA_CLIENT_HOME=$PWD
Note that when FABRIC_CA_CLIENT_HOME is set and an enrollment command fails, it is recommended that should delete the generated FABRIC_CA_CLIENT_HOME/msp folder and the generated fabric-ca-client.yaml file to avoid confusion before reattempting the enrollment command.
Intermediate CA server fails to start
Problem: The intermediate CA server fails to start with the error:
Error: Response from server: Error Code: 0 - Certificate signing failure: {"code":5300,"message":"Policy violation request"}
You may also see the associated error on the root CA:
[ERROR] local signer certificate disallows CA MaxPathLen extending
[INFO] 9.27.117.220:49864 POST /enroll 500 0 "Certificate signing failure: {"code":5300,"message":"Policy violation request"}"
Solution:
The values of the signing.profiles.ca.caconstraint.maxpathlen and the csr.ca.pathlength fields in the intermediate CA configuration .yaml file need to be set to 0.
Starting the intermediate CA fails
Problem: When you start the intermediate CA it fails with an error:
Post https://host1.com:7060/enroll: x509: certificate signed by unknown authority
And the Root organization CA, has the error:
TLS handshake error from 192.168.1.134:63094: remote error: tls: bad certificate
Solution:
This problem occurs during enrollment of the intermediate CA admin user with the root CA when the intermediate CA server is started. To resolve this problem, make sure that the TLS certificate that is specified in the intermediate.tls.certfiles section of the intermediate CA fabric-ca-server-config.yaml file points to the TLS CA root certificate. If you are following these instructions it will be tls/tls-ca-cert.pem.
Enrolling the intermediate CA admin user fails
Problem: When you start the intermediate CA and the process fails with the error:
Error: Response from server: Error Code: 0 - Chain file does not exist at /fabric-ca-server-int-ca/ca-chain.pem
Solution:
Because you modified the csr block of the intermediate CA configuration file, you need to delete the intermediate CA, ca-cert.pem file and the /msp folder before you start the intermediate CA server.