Fabric CA Operations Guide
This guide will illustrate how to use Fabric CA to setup a Fabric network. All identities that participate on a Hyperledger Fabric blockchain network must be authorized. This authorization is provided in the form of cryptographic material that is verified against trusted authorities.
In this guide, you will see the process for setting up a blockchain network that includes two organizations, each with two peers and an orderer. You’ll see how to generate cryptographic material for orderers, peers, administrators, and end users so that private keys never leave the host or container where they are generated.
Topology
In this example, we will look at how to setup up an orderer, peers, and CAs across three organizations. The topology of this deployment can be seen in the image below:
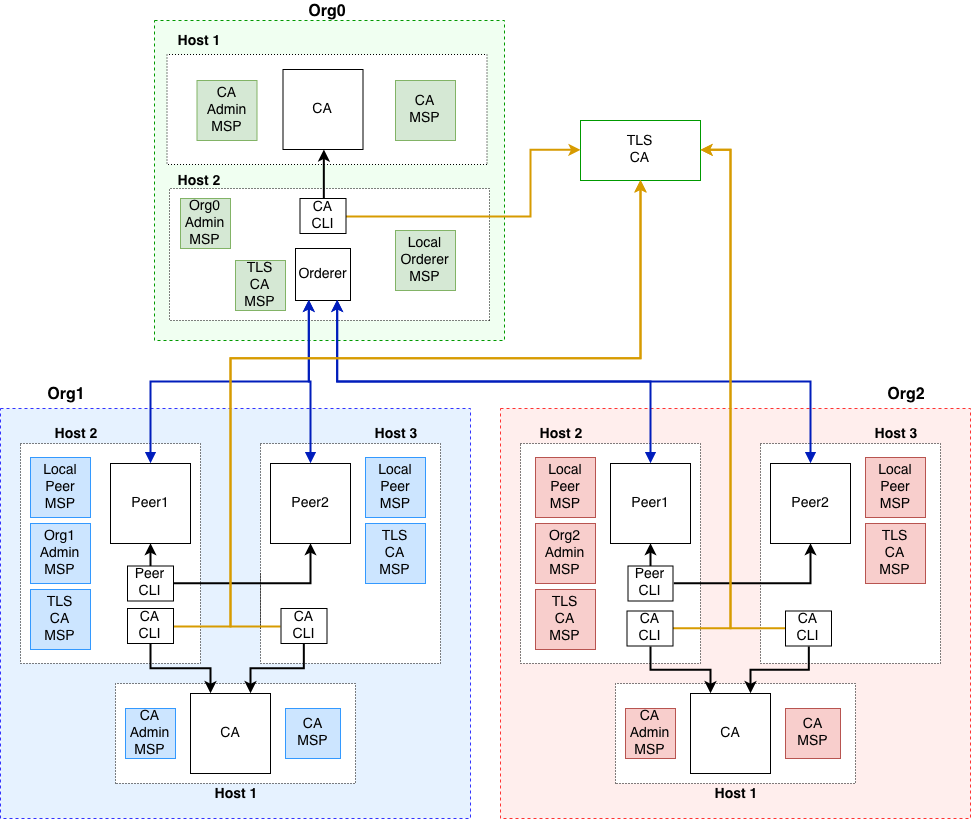
This example will simulate a deployment using docker containers. The containers will be treated as if they are running on different host machines. This is done so that you can see which assets need to be exchanged out-of-band between the parties involved in the network.
The network configuration for docker assumes that all containers are running in the same network. If your deployment is spread across different networks, the example will need to be adjusted to work with your network configurations.
The documentation below breaks down the docker-compose file to talk about individual components. To see the entire docker-compose, click here.
Setup CAs
Download fabric-ca-client binary
For each host that needs to acquire cryptographic material, you will need to have the fabric-ca-client binary available on the host machine. The client will be used to connect to the Fabric CA server container.
To download the fabric-ca-client binary, browse to this repository and select the latest binary for your machine.
Note
This example is using version 1.4.0 of fabric-ca-client.
Setup TLS CA
A TLS CA is used to issue TLS certificates. These certificates are required in order to secure the communication between various processes.
In order to simplify this example, all organizations will use the same TLS CA and TLS mutual authentication is disabled.
Note
In a production environment, you will probably use your organization’s CA to get TLS certificates. You will have to transfer out-of-band your CA’s certificate with organizations that will validate your TLS certificates. Thus, unlike this example, each organization would have its own TLS CA.
A docker service, such as the one below can be used to a launch a Fabric TLS CA container.
ca-tls:
  container_name: ca-tls
  image: hyperledger/fabric-ca
  command: sh -c 'fabric-ca-server start -d -b tls-ca-admin:tls-ca-adminpw --port 7052'
  environment:
    - FABRIC_CA_SERVER_HOME=/tmp/hyperledger/fabric-ca/crypto
    - FABRIC_CA_SERVER_TLS_ENABLED=true
    - FABRIC_CA_SERVER_CSR_CN=ca-tls
    - FABRIC_CA_SERVER_CSR_HOSTS=0.0.0.0
    - FABRIC_CA_SERVER_DEBUG=true
  volumes:
    - /tmp/hyperledger/tls/ca:/tmp/hyperledger/fabric-ca
  networks:
    - fabric-ca
  ports:
    - 7052:7052
This container can be started using the following docker command.
docker-compose up ca-tls
On a successful launch of the container, you will see the following line in the CA container’s log.
[INFO] Listening on https://0.0.0.0:7052
At this point the TLS CA server is on a listening on a secure socket, and can start issuing TLS certificates.
Enroll TLS CA’s Admin
Before you can start using the CA client, you must acquire the signing certificate for the CA’s TLS certificate. This is a required step before you can connect using TLS.
In our example, you would need to acquire the file located at /tmp/hyperledger/tls-ca/crypto/ca-cert.pem
on the machine running the TLS CA server and copy this file over to the host where
you will be running the CA client binary. This certificate, also known as the TLS
CA’s signing certificate is going to be used to validate the TLS certificate of
the CA. Once the certificate has been copied over to the CA client’s host
machine, you can start issuing commands using the CA.
The TLS CA’s signing certificate will need to be available on each host that will run commands against the TLS CA.
The TLS CA server was started with a bootstrap identity which has full admin privileges for the server. One of the key abilities of the admin is the ability to register new identities. The administrator for this CA will use the Fabric CA client to register four new identities with the CA, one for each peer and one for the orderer. These identities will be used to get TLS certificates for peers and orderers.
You will issue the commands below to enroll the TLS CA admin and then register
identities. We assume the trusted root certificate for the TLS CA has been copied
to /tmp/hyperledger/tls-ca/crypto/tls-ca-cert.pem on all host machines that
will communicate with this CA via the fabric-ca-client.
export FABRIC_CA_CLIENT_TLS_CERTFILES=/tmp/hyperledger/tls-ca/crypto/tls-ca-cert.pem
export FABRIC_CA_CLIENT_HOME=/tmp/hyperledger/tls-ca/admin
fabric-ca-client enroll -d -u https://tls-ca-admin:tls-ca-adminpw@0.0.0.0:7052
fabric-ca-client register -d --id.name peer1-org1 --id.secret peer1PW --id.type peer -u https://0.0.0.0:7052
fabric-ca-client register -d --id.name peer2-org1 --id.secret peer2PW --id.type peer -u https://0.0.0.0:7052
fabric-ca-client register -d --id.name peer1-org2 --id.secret peer1PW --id.type peer -u https://0.0.0.0:7052
fabric-ca-client register -d --id.name peer2-org2 --id.secret peer2PW --id.type peer -u https://0.0.0.0:7052
fabric-ca-client register -d --id.name orderer1-org0 --id.secret ordererPW --id.type orderer -u https://0.0.0.0:7052
Note
If the path of the environment variable FABRIC_CA_CLIENT_TLS_CERTFILES is not an absolute path, it will be parsed as relative to the client’s home directory.
With the identities registered on the TLS CA, we can move forward to setting up the each organization’s network. Anytime we need to get TLS certificates for a node in an organization, we will refer to this CA.
Setup Orderer Org CA
Each organization must have its own Certificate Authority (CA) for issuing enrollment certificates. The CA will issue the certificates for each of the peers and clients in the organization.
Your CA creates the identities that belong to your organization and issue each identity a public and private key. These keys are what allow all of your nodes and applications to sign and verify their actions. Any identity signed by your CA will be understood by other members of the network to identify the components that belong to your organization.
An administrator for Org0 will launch a Fabric CA docker container, which will be used by Org0 to issue cryptographic material for identities in Org0.
A docker service such as the one below can be used to a launch a Fabric CA container.
rca-org0:
   container_name: rca-org0
   image: hyperledger/fabric-ca
   command: /bin/bash -c 'fabric-ca-server start -d -b rca-org0-admin:rca-org0-adminpw --port 7053'
   environment:
      - FABRIC_CA_SERVER_HOME=/tmp/hyperledger/fabric-ca/crypto
      - FABRIC_CA_SERVER_TLS_ENABLED=true
      - FABRIC_CA_SERVER_CSR_CN=rca-org0
      - FABRIC_CA_SERVER_CSR_HOSTS=0.0.0.0
      - FABRIC_CA_SERVER_DEBUG=true
   volumes:
      - /tmp/hyperledger/org0/ca:/tmp/hyperledger/fabric-ca
   networks:
      - fabric-ca
   ports:
      - 7053:7053
On a successful launch of the container, you will see the following line in the CA container’s log.
[INFO] Listening on https://0.0.0.0:7053
At this point the CA server is listening on a secure socket, and can start issuing cryptographic material.
Enroll Orderer Org’s CA Admin
You will issue the commands below to enroll the CA admin and then register both of Org0’s identities.
In the commands below, we will assume the trusted root certificate for the CA’s
TLS certificate has been copied to
/tmp/hyperledger/org0/ca/crypto/ca-cert.pem
on the host machine where the fabric-ca-client binary is present.
If the client binary is located on a different host, you will need to get
the signing certificate through an out-of-band process.
- The following identities will be registered:
Orderer (orderer1-org0)
Orderer admin (admin-org0)
export FABRIC_CA_CLIENT_TLS_CERTFILES=/tmp/hyperledger/org0/ca/crypto/ca-cert.pem
export FABRIC_CA_CLIENT_HOME=/tmp/hyperledger/org0/ca/admin
fabric-ca-client enroll -d -u https://rca-org0-admin:rca-org0-adminpw@0.0.0.0:7053
fabric-ca-client register -d --id.name orderer1-org0 --id.secret ordererpw --id.type orderer -u https://0.0.0.0:7053
fabric-ca-client register -d --id.name admin-org0 --id.secret org0adminpw --id.type admin --id.attrs "hf.Registrar.Roles=client,hf.Registrar.Attributes=*,hf.Revoker=true,hf.GenCRL=true,admin=true:ecert,abac.init=true:ecert" -u https://0.0.0.0:7053
The enroll command you executed above, would have populated the
/tmp/hyperledger/org0/ca/admin directory with the cryptographic material
issued form the CA. You will see files such as the ones below:
admin
├── fabric-ca-client-config.yaml
└── msp
   ├── IssuerPublicKey
   ├── IssuerRevocationPublicKey
   ├── cacerts
   │   └── 0-0-0-0-7053.pem
   ├── keystore
   │   └── 60b6a16b8b5ba3fc3113c522cce86a724d7eb92d6c3961cfd9afbd27bf11c37f_sk
   ├── signcerts
   │   └── cert.pem
   └── user
The fabric-ca-client-config.yaml is a file that is generated by the CA client,
this file contains the configuration of the CA client. There are three other important files
to note. First one is 0-0-0-0-7053.pem, this is the public certificate of the
CA that issued the certificate for this identity. Second is 60b6a16b8b5ba3fc3113c522cce86a724d7eb92d6c3961cfd9afbd27bf11c37f_sk,
this is the private key that was generated by the client. The name of this file
is variable and will be different every time a key is generated. The last item is cert.pem,
this is the certificate of the admin that was signed and issued by the CA.
Setup Org1’s CA
The same set of steps you performed for Org0 apply to Org1’s CA.
An administrator for Org1 will launch a Fabric CA docker container, which will be used by Org1 to issue cryptographic material for identities in Org1.
A docker service, such as the one below can be used to a launch a Fabric CA container.
rca-org1:
   container_name: rca-org1
   image: hyperledger/fabric-ca
   command: /bin/bash -c 'fabric-ca-server start -d -b rca-org1-admin:rca-org1-adminpw'
   environment:
      - FABRIC_CA_SERVER_HOME=/tmp/hyperledger/fabric-ca/crypto
      - FABRIC_CA_SERVER_TLS_ENABLED=true
      - FABRIC_CA_SERVER_CSR_CN=rca-org1
      - FABRIC_CA_SERVER_CSR_HOSTS=0.0.0.0
      - FABRIC_CA_SERVER_DEBUG=true
   volumes:
      - /tmp/hyperledger/org1/ca:/tmp/hyperledger/fabric-ca
   networks:
      - fabric-ca
   ports:
      - 7054:7054
On a successful launch of the container, you will see the following line in the CA container’s log.
[INFO] Listening on https://0.0.0.0:7054
At this point the CA server is listening on a secure socket, and can start issuing cryptographic material.
Enroll Org1’s CA Admin
You will issue the commands below to enroll the CA admin and then register both of Org1’s identities.
- The following identities are being registered:
Peer 1 (peer1-org1)
Peer 2 (peer2-org1)
Admin (admin1-org1)
End user (user-org1)
In the commands below, we will assume the trusted root certificate for the CA’s
TLS certificate has been copied to
/tmp/hyperledger/org1/ca/crypto/ca-cert.pem
on the host machine where the fabric-ca-client binary is present.
If the client’s binary is located on a different host, you will need to get the
signing certificate through an out-of-band process.
export FABRIC_CA_CLIENT_TLS_CERTFILES=/tmp/hyperledger/org1/ca/crypto/ca-cert.pem
export FABRIC_CA_CLIENT_HOME=/tmp/hyperledger/org1/ca/admin
fabric-ca-client enroll -d -u https://rca-org1-admin:rca-org1-adminpw@0.0.0.0:7054
fabric-ca-client register -d --id.name peer1-org1 --id.secret peer1PW --id.type peer -u https://0.0.0.0:7054
fabric-ca-client register -d --id.name peer2-org1 --id.secret peer2PW --id.type peer -u https://0.0.0.0:7054
fabric-ca-client register -d --id.name admin-org1 --id.secret org1AdminPW --id.type admin -u https://0.0.0.0:7054
fabric-ca-client register -d --id.name user-org1 --id.secret org1UserPW --id.type user -u https://0.0.0.0:7054
Setup Org2’s CA
The same set of steps that you followed for Org1 apply to Org2. So, we will quickly go through the set of steps that the administrator for Org2 will perform.
A docker service, such as the one below can be used to a launch a Fabric CA for Org2.
rca-org2:
  container_name: rca-org2
  image: hyperledger/fabric-ca
  command: /bin/bash -c 'fabric-ca-server start -d -b rca-org2-admin:rca-org2-adminpw --port 7055'
  environment:
    - FABRIC_CA_SERVER_HOME=/tmp/hyperledger/fabric-ca/crypto
    - FABRIC_CA_SERVER_TLS_ENABLED=true
    - FABRIC_CA_SERVER_CSR_CN=rca-org2
    - FABRIC_CA_SERVER_CSR_HOSTS=0.0.0.0
    - FABRIC_CA_SERVER_DEBUG=true
  volumes:
    - /tmp/hyperledger/org2/ca:/tmp/hyperledger/fabric-ca
  networks:
    - fabric-ca
  ports:
    - 7055:7055
On a successful launch of the container, you will see the following line in the CA container’s log.
[INFO] Listening on https://0.0.0.0:7055
At this point the CA server is listening on a secure socket, and can start issuing cryptographic material.
Enrolling Org2’s CA Admin
You will issue the commands below to get the CA admin enrolled and all peer
related identities registered. In the commands below, we will assume the trusted
root certificate of CA’s TLS certificate has been copied to
/tmp/hyperledger/org2/ca/crypto/ca-cert.pem.
export FABRIC_CA_CLIENT_TLS_CERTFILES=/tmp/hyperledger/org2/ca/crypto/ca-cert.pem
export FABRIC_CA_CLIENT_HOME=/tmp/hyperledger/org2/ca/admin
fabric-ca-client enroll -d -u https://rca-org2-admin:rca-org2-adminpw@0.0.0.0:7055
fabric-ca-client register -d --id.name peer1-org2 --id.secret peer1PW --id.type peer -u https://0.0.0.0:7055
fabric-ca-client register -d --id.name peer2-org2 --id.secret peer2PW --id.type peer -u https://0.0.0.0:7055
fabric-ca-client register -d --id.name admin-org2 --id.secret org2AdminPW --id.type admin -u https://0.0.0.0:7055
fabric-ca-client register -d --id.name user-org2 --id.secret org2UserPW --id.type user -u https://0.0.0.0:7055
Setup Peers
Once the CAs are up and running, we can start enrolling peers.
Setup Org1’s Peers
An administrator for Org1 will enroll the peers with its CA and then launch the peer docker containers. Before you can start up a peer, you will need to enroll the peer identities with the CA to get the MSP that the peer will use. This is known as the local peer MSP.
Enroll Peer1
If the host machine running Peer1 does not have the fabric-ca-client binary, refer to the instructions above on to download the binary.
In the command below, we will assume the trusted root certificate of Org1 has
been copied to /tmp/hyperledger/org1/peer1/assets/ca/org1-ca-cert.pem
on Peer1’s host machine. Acquiring of the signing certificate is an out of
band process.
export FABRIC_CA_CLIENT_HOME=/tmp/hyperledger/org1/peer1
export FABRIC_CA_CLIENT_TLS_CERTFILES=/tmp/hyperledger/org1/peer1/assets/ca/org1-ca-cert.pem
export FABRIC_CA_CLIENT_MSPDIR=msp
fabric-ca-client enroll -d -u https://peer1-org1:peer1PW@0.0.0.0:7054
Next step is to get the TLS cryptographic material for the peer. This requires another enrollment,
but this time you will enroll against the tls profile on the TLS CA. You will
also need to provide the address of the Peer1’s host name or domain name in the enrollment
request as the input to the csr.hosts flag. This value will be used for the TLS certificate’s Subject Alternative Name.
In the command below, we will assume the certificate of the TLS CA has been copied to
/tmp/hyperledger/org1/peer1/assets/tls-ca/tls-ca-cert.pem
on Peer1’s host machine.
export FABRIC_CA_CLIENT_MSPDIR=tls-msp
export FABRIC_CA_CLIENT_TLS_CERTFILES=/tmp/hyperledger/org1/peer1/assets/tls-ca/tls-ca-cert.pem
fabric-ca-client enroll -d -u https://peer1-org1:peer1PW@0.0.0.0:7052 --enrollment.profile tls --csr.hosts peer1-org1
Go to path /tmp/hyperledger/org1/peer1/tls-msp/keystore and change the name of
the key to key.pem. This will make it easy to be able to refer to in
later steps.
At this point, you will have two MSP directories. One MSP contains peer’s enrollment
certificate and the other has the peer’s TLS certificate. However, there needs to be
an additional folder added in the enrollment MSP directory, and this is the admincerts
folder. This folder will contain certificate(s) for the administrator of Org1.
We will talk more about this when we enroll Org1’s admin a little further down.
Enroll Peer2
You will perform similar commands for Peer2. In the commands below, we will
assume the trusted root certificate of Org1 has been copied to
/tmp/hyperledger/org1/peer2/assets/ca/org1-ca-cert.pem on Peer2’s host
machine.
export FABRIC_CA_CLIENT_HOME=/tmp/hyperledger/org1/peer2
export FABRIC_CA_CLIENT_TLS_CERTFILES=/tmp/hyperledger/org1/peer2/assets/ca/org1-ca-cert.pem
export FABRIC_CA_CLIENT_MSPDIR=msp
fabric-ca-client enroll -d -u https://peer2-org1:peer2PW@0.0.0.0:7054
Next step is to get the TLS cryptographic material for the peer. This requires another enrollment,
but this time you will enroll against the tls profile on the TLS CA. You will
also need to provide the address of the Peer2’s host name or domain name in the enrollment
request as the input to the csr.hosts flag. In the command below, we will
assume the certificate of the TLS CA has been copied to
/tmp/hyperledger/org1/peer2/assets/tls-ca/tls-ca-cert.pem
on Peer2’s host machine.
export FABRIC_CA_CLIENT_MSPDIR=tls-msp
export FABRIC_CA_CLIENT_TLS_CERTFILES=/tmp/hyperledger/org1/peer2/assets/tls-ca/tls-ca-cert.pem
fabric-ca-client enroll -d -u https://peer2-org1:peer2PW@0.0.0.0:7052 --enrollment.profile tls --csr.hosts peer2-org1
Go to path /tmp/hyperledger/org1/peer2/tls-msp/keystore and change the name of
the key to key.pem. This will make it easy to be able to refer to in
later steps.
At this point, you will have two MSP directories. One MSP contains peer’s enrollment
certificate and the other has the peer’s TLS certificate. You will add the
admincerts folder to the enrollment MSP once the admin has been enrolled.
Enroll Org1’s Admin
At this point, both peers have been enrolled. Now, you will enroll Org1’s admin identity. The admin identity is responsible for activities such as installing and instantiating chaincode. The steps below will enroll the admin. In the commands below, we will assume that they are being executed on Peer1’s host machine.
export FABRIC_CA_CLIENT_HOME=/tmp/hyperledger/org1/admin
export FABRIC_CA_CLIENT_TLS_CERTFILES=/tmp/hyperledger/org1/peer1/assets/ca/org1-ca-cert.pem
export FABRIC_CA_CLIENT_MSPDIR=msp
fabric-ca-client enroll -d -u https://admin-org1:org1AdminPW@0.0.0.0:7054
After enrollment, you should have an admin MSP. You will copy the
certificate from this MSP and move it to the Peer1’s MSP in the admincerts
folder. You will need to disseminate this admin certificate to other peers in the
org, and it will need to go in to the admincerts folder of each peers’ MSP.
The command below is only for Peer1, the exchange of the admin certificate to Peer2 will happen out-of-band.
mkdir /tmp/hyperledger/org1/peer1/msp/admincerts
cp /tmp/hyperledger/org1/admin/msp/signcerts/cert.pem /tmp/hyperledger/org1/peer1/msp/admincerts/org1-admin-cert.pem
If the admincerts folder is missing from the peer’s local MSP, the peer will
fail to start up.
Launch Org1’s Peers
Once we have enrolled all the peers and org admin, we have the necessary MSPs to start the peers.
A docker service, such as the one below can be used to a launch a container for Peer1.
peer1-org1:
  container_name: peer1-org1
  image: hyperledger/fabric-peer
  environment:
    - CORE_PEER_ID=peer1-org1
    - CORE_PEER_ADDRESS=peer1-org1:7051
    - CORE_PEER_LOCALMSPID=org1MSP
    - CORE_PEER_MSPCONFIGPATH=/tmp/hyperledger/org1/peer1/msp
    - CORE_VM_ENDPOINT=unix:///host/var/run/docker.sock
    - CORE_VM_DOCKER_HOSTCONFIG_NETWORKMODE=guide_fabric-ca
    - FABRIC_LOGGING_SPEC=debug
    - CORE_PEER_TLS_ENABLED=true
    - CORE_PEER_TLS_CERT_FILE=/tmp/hyperledger/org1/peer1/tls-msp/signcerts/cert.pem
    - CORE_PEER_TLS_KEY_FILE=/tmp/hyperledger/org1/peer1/tls-msp/keystore/key.pem
    - CORE_PEER_TLS_ROOTCERT_FILE=/tmp/hyperledger/org1/peer1/tls-msp/tlscacerts/tls-0-0-0-0-7052.pem
    - CORE_PEER_GOSSIP_USELEADERELECTION=true
    - CORE_PEER_GOSSIP_ORGLEADER=false
    - CORE_PEER_GOSSIP_EXTERNALENDPOINT=peer1-org1:7051
    - CORE_PEER_GOSSIP_SKIPHANDSHAKE=true
  working_dir: /opt/gopath/src/github.com/hyperledger/fabric/org1/peer1
  volumes:
    - /var/run:/host/var/run
    - /tmp/hyperledger/org1/peer1:/tmp/hyperledger/org1/peer1
  networks:
    - fabric-ca
Launching the peer service will bring up a peer container, and in the logs you will see the following line:
serve -> INFO 020 Started peer with ID=[name:"peer1-org1" ], network ID=[dev], address=[peer1-org1:7051]
A docker service, such as the one below can be used to a launch a container for Peer2.
peer2-org1:
  container_name: peer2-org1
  image: hyperledger/fabric-peer
  environment:
    - CORE_PEER_ID=peer2-org1
    - CORE_PEER_ADDRESS=peer2-org1:7051
    - CORE_PEER_LOCALMSPID=org1MSP
    - CORE_PEER_MSPCONFIGPATH=/tmp/hyperledger/org1/peer2/msp
    - CORE_VM_ENDPOINT=unix:///host/var/run/docker.sock
    - CORE_VM_DOCKER_HOSTCONFIG_NETWORKMODE=guide_fabric-ca
    - FABRIC_LOGGING_SPEC=grpc=debug:info
    - CORE_PEER_TLS_ENABLED=true
    - CORE_PEER_TLS_CERT_FILE=/tmp/hyperledger/org1/peer2/tls-msp/signcerts/cert.pem
    - CORE_PEER_TLS_KEY_FILE=/tmp/hyperledger/org1/peer2/tls-msp/keystore/key.pem
    - CORE_PEER_TLS_ROOTCERT_FILE=/tmp/hyperledger/org1/peer2/tls-msp/tlscacerts/tls-0-0-0-0-7052.pem
    - CORE_PEER_GOSSIP_USELEADERELECTION=true
    - CORE_PEER_GOSSIP_ORGLEADER=false
    - CORE_PEER_GOSSIP_EXTERNALENDPOINT=peer2-org1:7051
    - CORE_PEER_GOSSIP_SKIPHANDSHAKE=true
    - CORE_PEER_GOSSIP_BOOTSTRAP=peer1-org1:7051
  working_dir: /opt/gopath/src/github.com/hyperledger/fabric/org1/peer2
  volumes:
    - /var/run:/host/var/run
    - /tmp/hyperledger/org1/peer2:/tmp/hyperledger/org1/peer2
  networks:
    - fabric-ca
Launching the peer service will bring up a peer container, and in the logs you will see the following line:
serve -> INFO 020 Started peer with ID=[name:"peer2-org1" ], network ID=[dev], address=[peer2-org1:7051]
Setup Org2’s Peers
An administrator for Org2 will use the CA’s bootstrap identity to enroll the peers with the CA and then launch the peer docker containers.
Enroll Peer1
You will issue the commands below to enroll Peer1. In the commands below,
we will assume the trusted root certificate of Org2 is available at
/tmp/hyperledger/org2/peer1/assets/ca/org2-ca-cert.pem on Peer1’s host machine.
export FABRIC_CA_CLIENT_HOME=/tmp/hyperledger/org2/peer1
export FABRIC_CA_CLIENT_TLS_CERTFILES=/tmp/hyperledger/org2/peer1/assets/ca/org2-ca-cert.pem
export FABRIC_CA_CLIENT_MSPDIR=msp
fabric-ca-client enroll -d -u https://peer1-org2:peer1PW@0.0.0.0:7055
Next, you will get the TLS certificate. In the command below, we will assume the
certificate of the TLS CA has been copied to /tmp/hyperledger/org2/peer1/assets/tls-ca/tls-ca-cert.pem
on Peer1’s host machine.
export FABRIC_CA_CLIENT_MSPDIR=tls-msp
export FABRIC_CA_CLIENT_TLS_CERTFILES=/tmp/hyperledger/org2/peer1/assets/tls-ca/tls-ca-cert.pem
fabric-ca-client enroll -d -u https://peer1-org2:peer1PW@0.0.0.0:7052 --enrollment.profile tls --csr.hosts peer1-org2
Go to path /tmp/hyperledger/org2/peer1/tls-msp/keystore and change the name of the
key to key.pem.
Enroll Peer2
You will issue the commands below to get Peer2 enrolled. In the commands below,
we will assume the trusted root certificate of Org2 is available at
/tmp/hyperledger/org2/peer2/assets/ca/org2-ca-cert.pem on Peer2’s host machine.
export FABRIC_CA_CLIENT_HOME=/tmp/hyperledger/org2/peer2
export FABRIC_CA_CLIENT_TLS_CERTFILES=/tmp/hyperledger/org2/peer2/assets/ca/org2-ca-cert.pem
export FABRIC_CA_CLIENT_MSPDIR=msp
fabric-ca-client enroll -d -u https://peer2-org2:peer2PW@0.0.0.0:7055
Next, you will get the TLS certificate. In the command below, we will assume the
certificate of the TLS CA has been copied to /tmp/hyperledger/org2/peer2/assets/tls-ca/tls-ca-cert.pem
on Peer2’s host machine.
export FABRIC_CA_CLIENT_MSPDIR=tls-msp
export FABRIC_CA_CLIENT_TLS_CERTFILES=/tmp/hyperledger/org2/peer2/assets/tls-ca/tls-ca-cert.pem
fabric-ca-client enroll -d -u https://peer2-org2:peer2PW@0.0.0.0:7052 --enrollment.profile tls --csr.hosts peer2-org2
Go to path /tmp/hyperledger/org2/peer2/tls-msp/keystore and change the name
of the key to key.pem.
Enroll Org2’s Admin
At this point, you will have two MSP directories. One MSP contains your enrollment
certificate and the other has your TLS certificate. However, there needs be one
additional folder added in the enrollment MSP directory, and this is the admincerts
folder. This folder will contain certificates for the administrator of Org2.
The steps below will enroll the admin. In the commands below, we will assume that they are being executed on Peer1’s host machine.
export FABRIC_CA_CLIENT_HOME=/tmp/hyperledger/org2/admin
export FABRIC_CA_CLIENT_TLS_CERTFILES=/tmp/hyperledger/org2/peer1/assets/ca/org2-ca-cert.pem
export FABRIC_CA_CLIENT_MSPDIR=msp
fabric-ca-client enroll -d -u https://admin-org2:org2AdminPW@0.0.0.0:7055
After enrollment, you should have an admin MSP. You will copy the certificate from
this MSP and move it to the peer MSP under the admincerts folder. The commands
below are only for Peer1, the exchange of admin cert to peer2 will happen out-of-band.
mkdir /tmp/hyperledger/org2/peer1/msp/admincerts
cp /tmp/hyperledger/org2/admin/msp/signcerts/cert.pem /tmp/hyperledger/org2/peer1/msp/admincerts/org2-admin-cert.pem
If the admincerts folder is missing from the peer’s local MSP, the peer will
fail to start up.
Launch Org2’s Peers
Once we have enrolled all the peers and admin, we have the necessary MSPs to start the peers.
A docker service, such as the one below can be used to a launch a container for the peer1.
peer1-org2:
  container_name: peer1-org2
  image: hyperledger/fabric-peer
  environment:
    - CORE_PEER_ID=peer1-org2
    - CORE_PEER_ADDRESS=peer1-org2:7051
    - CORE_PEER_LOCALMSPID=org2MSP
    - CORE_PEER_MSPCONFIGPATH=/tmp/hyperledger/org2/peer1/msp
    - CORE_VM_ENDPOINT=unix:///host/var/run/docker.sock
    - CORE_VM_DOCKER_HOSTCONFIG_NETWORKMODE=guide_fabric-ca
    - FABRIC_LOGGING_SPEC=debug
    - CORE_PEER_TLS_ENABLED=true
    - CORE_PEER_TLS_CERT_FILE=/tmp/hyperledger/org2/peer1/tls-msp/signcerts/cert.pem
    - CORE_PEER_TLS_KEY_FILE=/tmp/hyperledger/org2/peer1/tls-msp/keystore/key.pem
    - CORE_PEER_TLS_ROOTCERT_FILE=/tmp/hyperledger/org2/peer1/tls-msp/tlscacerts/tls-0-0-0-0-7052.pem
    - CORE_PEER_GOSSIP_USELEADERELECTION=true
    - CORE_PEER_GOSSIP_ORGLEADER=false
    - CORE_PEER_GOSSIP_EXTERNALENDPOINT=peer1-org2:7051
    - CORE_PEER_GOSSIP_SKIPHANDSHAKE=true
  working_dir: /opt/gopath/src/github.com/hyperledger/fabric/org2/peer1
  volumes:
    - /var/run:/host/var/run
    - /tmp/hyperledger/org2/peer1:/tmp/hyperledger/org2/peer1
  networks:
    - fabric-ca
Launching the peer service will bring up a peer container, and in the logs you will see the following line:
serve -> INFO 020 Started peer with ID=[name:"peer1-org2" ], network ID=[dev], address=[peer1-org2:7051]
A docker service, such as the one below can be used to a launch a container for the peer2.
peer2-org2:
  container_name: peer2-org2
  image: hyperledger/fabric-peer
  environment:
    - CORE_PEER_ID=peer2-org2
    - CORE_PEER_ADDRESS=peer2-org2:7051
    - CORE_PEER_LOCALMSPID=org2MSP
    - CORE_PEER_MSPCONFIGPATH=/tmp/hyperledger/org2/peer2/msp
    - CORE_VM_ENDPOINT=unix:///host/var/run/docker.sock
    - CORE_VM_DOCKER_HOSTCONFIG_NETWORKMODE=guide_fabric-ca
    - FABRIC_LOGGING_SPEC=debug
    - CORE_PEER_TLS_ENABLED=true
    - CORE_PEER_TLS_CERT_FILE=/tmp/hyperledger/org2/peer2/tls-msp/signcerts/cert.pem
    - CORE_PEER_TLS_KEY_FILE=/tmp/hyperledger/org2/peer2/tls-msp/keystore/key.pem
    - CORE_PEER_TLS_ROOTCERT_FILE=/tmp/hyperledger/org2/peer2/tls-msp/tlscacerts/tls-0-0-0-0-7052.pem
    - CORE_PEER_GOSSIP_USELEADERELECTION=true
    - CORE_PEER_GOSSIP_ORGLEADER=false
    - CORE_PEER_GOSSIP_EXTERNALENDPOINT=peer2-org2:7051
    - CORE_PEER_GOSSIP_SKIPHANDSHAKE=true
    - CORE_PEER_GOSSIP_BOOTSTRAP=peer1-org2:7051
  working_dir: /opt/gopath/src/github.com/hyperledger/fabric/org2/peer2
  volumes:
    - /var/run:/host/var/run
    - /tmp/hyperledger/org2/peer2:/tmp/hyperledger/org2/peer2
  networks:
    - fabric-ca
Launching the peer service will bring up a peer container, and in the logs you will see the following line:
serve -> INFO 020 Started peer with ID=[name:"peer2-org2" ], network ID=[dev], address=[peer2-org2:7052]
Setup Orderer
The last thing we need to setup is the orderer. We need to take a couple of actions before we can start up the orderer.
Enroll Orderer
Before starting the orderer, you will need to enroll the orderer’s identity with a CA to get the MSP that the orderer will use. This is known as the local orderer MSP.
If the host machine does not have the fabric-ca-client binary, please refer to the instructions above on to download the binary.
You will issue the commands below to get the orderer enrolled. In the commands
below, we will assume the trusted root certificates for Org0 is available in
/tmp/hyperledger/org0/orderer/assets/ca/org0-ca-cert.pem on the orderer’s
host machine.
export FABRIC_CA_CLIENT_HOME=/tmp/hyperledger/org0/orderer
export FABRIC_CA_CLIENT_TLS_CERTFILES=/tmp/hyperledger/org0/orderer/assets/ca/org0-ca-cert.pem
fabric-ca-client enroll -d -u https://orderer1-org0:ordererpw@0.0.0.0:7053
Next, you will get the TLS certificate. In the command below, we will assume the
certificate of the TLS CA has been copied to /tmp/hyperledger/org0/orderer/assets/tls-ca/tls-ca-cert.pem
on Orderer’s host machine.
export FABRIC_CA_CLIENT_MSPDIR=tls-msp
export FABRIC_CA_CLIENT_TLS_CERTFILES=/tmp/hyperledger/org0/orderer/assets/tls-ca/tls-ca-cert.pem
fabric-ca-client enroll -d -u https://orderer1-org0:ordererPW@0.0.0.0:7052 --enrollment.profile tls --csr.hosts orderer1-org0
Go to path /tmp/hyperledger/org0/orderer/tls-msp/keystore and change the name
of the key to key.pem.
At this point, you will have two MSP directories. One MSP contains your enrollment
certificate and the other has your TLS certificate. However, there needs be one
additional folder added in the enrollment MSP directory, this is the admincerts
folder. This folder will contain certificates for the administrator of peer 1.
Now, you will enroll the Org0’s admin identity by issuing the commands below.
Enroll Org0’s Admin
The command below assumes that this is being executed on the orderer’s host machine.
export FABRIC_CA_CLIENT_HOME=/tmp/hyperledger/org0/admin
export FABRIC_CA_CLIENT_TLS_CERTFILES=/tmp/hyperledger/org0/orderer/assets/ca/org0-ca-cert.pem
export FABRIC_CA_CLIENT_MSPDIR=msp
fabric-ca-client enroll -d -u https://admin-org0:org0adminpw@0.0.0.0:7053
After enrollment, you should have an msp folder at /tmp/hyperledger/org0/admin.
You will copy the certificate from this MSP and move it to the orderer’s MSP under the
admincerts folder.
mkdir /tmp/hyperledger/org0/orderer/msp/admincerts
cp /tmp/hyperledger/org0/admin/msp/signcerts/cert.pem /tmp/hyperledger/org0/orderer/msp/admincerts/orderer-admin-cert.pem
Create Genesis Block and Channel Transaction
The orderer requires a genesis block that it uses to bootstrap itself. You can find more information in the Hyperledger Fabric documentation
In documentation below, you’ll find a snippet of configtx.yaml that is written for this
specific deployment. For the full configtx.yaml, click here.
On the orderer’s host machine, we need to collect the MSPs for all the
organizations. The organization section in the configtx.yaml looks like:
Organizations:

- &org0

   Name: org0

   ID: org0MSP

   MSPDir: /tmp/hyperledger/org0/msp

- &org1

   Name: org1

   ID: org1MSP

   MSPDir: /tmp/hyperledger/org1/msp

   AnchorPeers:
      - Host: peer1-org1
         Port: 7051

- &org2

   Name: org2

   ID: org2MSP

   MSPDir: /tmp/hyperledger/org2/msp

   AnchorPeers:
      - Host: peer1-org2
        Port: 7051
The MSP for Org0 will contain the trusted root certificate of Org0, the certificate of the Org0’s admin identity, and the trusted root certificate of the TLS CA. The MSP folder structure can be seen below.
/tmp/hyperledger/org0/msp
├── admincerts
│   └── admin-org0-cert.pem
├── cacerts
│   └── org0-ca-cert.pem
├── tlscacerts
│   └── tls-ca-cert.pem
└── users
The pattern is the same for all organization. The MSP folder structure for Org1 would like:
/tmp/hyperledger/org1/msp
├── admincerts
│   └── admin-org1-cert.pem
├── cacerts
│   └── org1-ca-cert.pem
├── tlscacerts
│   └── tls-ca-cert.pem
└── users
The MSP folder structure for Org2 would like:
/tmp/hyperledger/org2/msp
├── admincerts
│   └── admin-org2-cert.pem
├── cacerts
│   └── org2-ca-cert.pem
├── tlscacerts
│   └── tls-ca-cert.pem
└── users
Once all these MSPs are present on the orderer’s host machine you will execute the
following commands from the directory in which configtx.yaml is present:
configtxgen -profile OrgsOrdererGenesis -outputBlock /tmp/hyperledger/org0/orderer/genesis.block -channelID syschannel
configtxgen -profile OrgsChannel -outputCreateChannelTx /tmp/hyperledger/org0/orderer/channel.tx -channelID mychannel
This will generate two artifacts, genesis.block and channel.tx, which will
be used in later steps.
Commands for gathering certificates
The Fabric CA client has a couple commands that are useful in acquiring the certificates for the orderer genesis and peer MSP setup.
The first command is the fabric-ca-client certificate command. This command can be used to get certificates for the admincerts folder. For more information on how to use this command , please refer to: listing certificate information
The second command is the fabric-ca-client getcainfo command. This command can be used to gather certificates for the cacerts and tlscacerts folders. The getcainfo command returns back the certificate of the CA.
Mutual TLS
Endpoints can be secured using Mutual TLS as well. If the CA, Peer, or Orderer are using mutual TLS then the client must also present a TLS certificate that will be verified by the server.
Mutual TLS requires the client to acquire a TLS certificate that it will present to the server. Acquiring a TLS certificate can be done via a TLS certificate authority that does have mutual TLS enabled. Once the client has acquired a TLS certificate, then it can start communication with mutual TLS enabled servers as long as the trusted TLS authority on the server is the same as issuing authority for the client’s TLS certificate.
Launch Orderer
Once you have created the genesis block and the channel transaction, you can define an orderer service that points to the genesis.block created above.
orderer1-org0:
  container_name: orderer1-org0
  image: hyperledger/fabric-orderer
  environment:
    - ORDERER_HOME=/tmp/hyperledger/orderer
    - ORDERER_HOST=orderer1-org0
    - ORDERER_GENERAL_LISTENADDRESS=0.0.0.0
    - ORDERER_GENERAL_GENESISMETHOD=file
    - ORDERER_GENERAL_GENESISFILE=/tmp/hyperledger/org0/orderer/genesis.block
    - ORDERER_GENERAL_LOCALMSPID=org0MSP
    - ORDERER_GENERAL_LOCALMSPDIR=/tmp/hyperledger/org0/orderer/msp
    - ORDERER_GENERAL_TLS_ENABLED=true
    - ORDERER_GENERAL_TLS_CERTIFICATE=/tmp/hyperledger/org0/orderer/tls-msp/signcerts/cert.pem
    - ORDERER_GENERAL_TLS_PRIVATEKEY=/tmp/hyperledger/org0/orderer/tls-msp/keystore/key.pem
    - ORDERER_GENERAL_TLS_ROOTCAS=[/tmp/hyperledger/org0/orderer/tls-msp/tlscacerts/tls-0-0-0-0-7052.pem]
    - ORDERER_GENERAL_LOGLEVEL=debug
    - ORDERER_DEBUG_BROADCASTTRACEDIR=data/logs
  volumes:
    - /tmp/hyperledger/org0/orderer:/tmp/hyperledger/org0/orderer/
  networks:
    - fabric-ca
Launching the orderer service will bring up an orderer container, and in the logs you will see the following line:
UTC [orderer/common/server] Start -> INFO 0b8 Beginning to serve requests
Create CLI Containers
Communication with peers requires a CLI container, the container contains the appropriate binaries that will allow you to issue peer related commands. You will create a CLI container for each org. In this example, we launch a CLI container in the same host machine as Peer1 for each org.
Launch Org1’s CLI
cli-org1:
   container_name: cli-org1
   image: hyperledger/fabric-tools
   tty: true
   stdin_open: true
   environment:
     - GOPATH=/opt/gopath
     - CORE_VM_ENDPOINT=unix:///host/var/run/docker.sock
     - FABRIC_LOGGING_SPEC=DEBUG
     - CORE_PEER_ID=cli-org1
     - CORE_PEER_ADDRESS=peer1-org1:7051
     - CORE_PEER_LOCALMSPID=org1MSP
     - CORE_PEER_TLS_ENABLED=true
     - CORE_PEER_TLS_ROOTCERT_FILE=/tmp/hyperledger/org1/peer1/tls-msp/tlscacerts/tls-0-0-0-0-7052.pem
     - CORE_PEER_MSPCONFIGPATH=/tmp/hyperledger/org1/peer1/msp
   working_dir: /opt/gopath/src/github.com/hyperledger/fabric/org1
   command: sh
   volumes:
     - /tmp/hyperledger/org1/peer1:/tmp/hyperledger/org1/peer1
     - /tmp/hyperledger/org1/peer1/assets/chaincode:/opt/gopath/src/github.com/hyperledger/fabric-samples/chaincode
     - /tmp/hyperledger/org1/admin:/tmp/hyperledger/org1/admin
   networks:
     - fabric-ca
Launch Org2’s CLI
cli-org2:
   container_name: cli-org2
   image: hyperledger/fabric-tools
   tty: true
   stdin_open: true
   environment:
     - GOPATH=/opt/gopath
     - CORE_VM_ENDPOINT=unix:///host/var/run/docker.sock
     - FABRIC_LOGGING_SPEC=DEBUG
     - CORE_PEER_ID=cli-org2
     - CORE_PEER_ADDRESS=peer1-org2:7051
     - CORE_PEER_LOCALMSPID=org2MSP
     - CORE_PEER_TLS_ENABLED=true
     - CORE_PEER_TLS_ROOTCERT_FILE=/tmp/hyperledger/org2/peer1/tls-msp/tlscacerts/tls-0-0-0-0-7052.pem
     - CORE_PEER_MSPCONFIGPATH=/tmp/hyperledger/org2/peer1/msp
   working_dir: /opt/gopath/src/github.com/hyperledger/fabric/org2
   command: sh
   volumes:
     - /tmp/hyperledger/org2/peer1:/tmp/hyperledger/org2/peer1
     - /tmp/hyperledger/org1/peer1/assets/chaincode:/opt/gopath/src/github.com/hyperledger/fabric-samples/chaincode
     - /tmp/hyperledger/org2/admin:/tmp/hyperledger/org2/admin
   networks:
     - fabric-ca
Create and Join Channel
Org1
With the CLI containers up and running, you can now issue commands to create and join a channel. We are going to use Peer1 to create the channel. In the host machine of Peer1, you will execute:
docker exec -it cli-org1 sh
This command will bring you inside the CLI container and open up a terminal. From here, you will execute the following commands using the admin MSP:
export CORE_PEER_MSPCONFIGPATH=/tmp/hyperledger/org1/admin/msp
peer channel create -c mychannel -f /tmp/hyperledger/org1/peer1/assets/channel.tx -o orderer1-org0:7050 --outputBlock /tmp/hyperledger/org1/peer1/assets/mychannel.block --tls --cafile /tmp/hyperledger/org1/peer1/tls-msp/tlscacerts/tls-0-0-0-0-7052.pem
The channel.tx is an artifact that was generated by running the
configtxgen command on the orderer. This artifact needs to be transferred
to Peer1’s host machine out-of-band from the orderer. The command above will generate
mychannel.block on Peer1 at the specified output path /tmp/hyperledger/org1/peer1/assets/mychannel.block,
which will be used by all peers in the network that wish
to join the channel. This mychannel.block will be need to transferred to all peers
in both Org1 and Org2 out-of-band.
The next commands you are going to run is to have Peer1 and Peer2 in join the channel.
export CORE_PEER_MSPCONFIGPATH=/tmp/hyperledger/org1/admin/msp
export CORE_PEER_ADDRESS=peer1-org1:7051
peer channel join -b /tmp/hyperledger/org1/peer1/assets/mychannel.block

export CORE_PEER_ADDRESS=peer2-org1:7051
peer channel join -b /tmp/hyperledger/org1/peer1/assets/mychannel.block
Org2
Run the following command to enter the CLI docker container.
docker exec -it cli-org2 sh
In Org2, you only need to have the peers join the channel. Peers in Org2 do not need to create the channel, this was already done by Org1. From inside the Org2 CLI container, you will execute the following commands using the admin MSP:
export CORE_PEER_MSPCONFIGPATH=/tmp/hyperledger/org2/admin/msp
export CORE_PEER_ADDRESS=peer1-org2:7051
peer channel join -b /tmp/hyperledger/org2/peer1/assets/mychannel.block

export CORE_PEER_ADDRESS=peer2-org2:7051
peer channel join -b /tmp/hyperledger/org2/peer1/assets/mychannel.block
Deploy Chaincode
Installing chaincode on a peer, and approving and committing the chaincode on a channel requires using the organization admin role, for example:
export CORE_PEER_ADDRESS=peer1-org1:7051
export CORE_PEER_MSPCONFIGPATH=/tmp/hyperledger/org1/admin/msp
For additional chaincode deployment details see the Fabric chaincode tutorial.