Fabric CA User’s Guide
The Hyperledger Fabric CA is a Certificate Authority (CA) for Hyperledger Fabric.
It provides features such as:
- registration of identities, or connects to LDAP as the user registry
- issuance of Enrollment Certificates (ECerts)
- certificate renewal and revocation
Hyperledger Fabric CA consists of both a server and a client component as described later in this document.
For developers interested in contributing to Hyperledger Fabric CA, see the Fabric CA repository for more information.
Table of Contents
- Overview
- Getting Started
- Configuration Settings
- Fabric CA Server
- Fabric CA Client
- Enrolling the bootstrap identity
- Registering a new identity
- Enrolling a peer identity
- Getting Identity Mixer credential
- Getting Idemix CRI (Certificate Revocation Information)
- Reenrolling an identity
- Revoking a certificate or identity
- Generating a CRL (Certificate Revocation List)
- Attribute-Based Access Control
- Dynamic Server Configuration Update
- Enabling TLS
- Contact specific CA instance
- Configuring an HSM
- File Formats
- Troubleshooting
Overview
The diagram below illustrates how the Hyperledger Fabric CA server fits into the overall Hyperledger Fabric architecture.
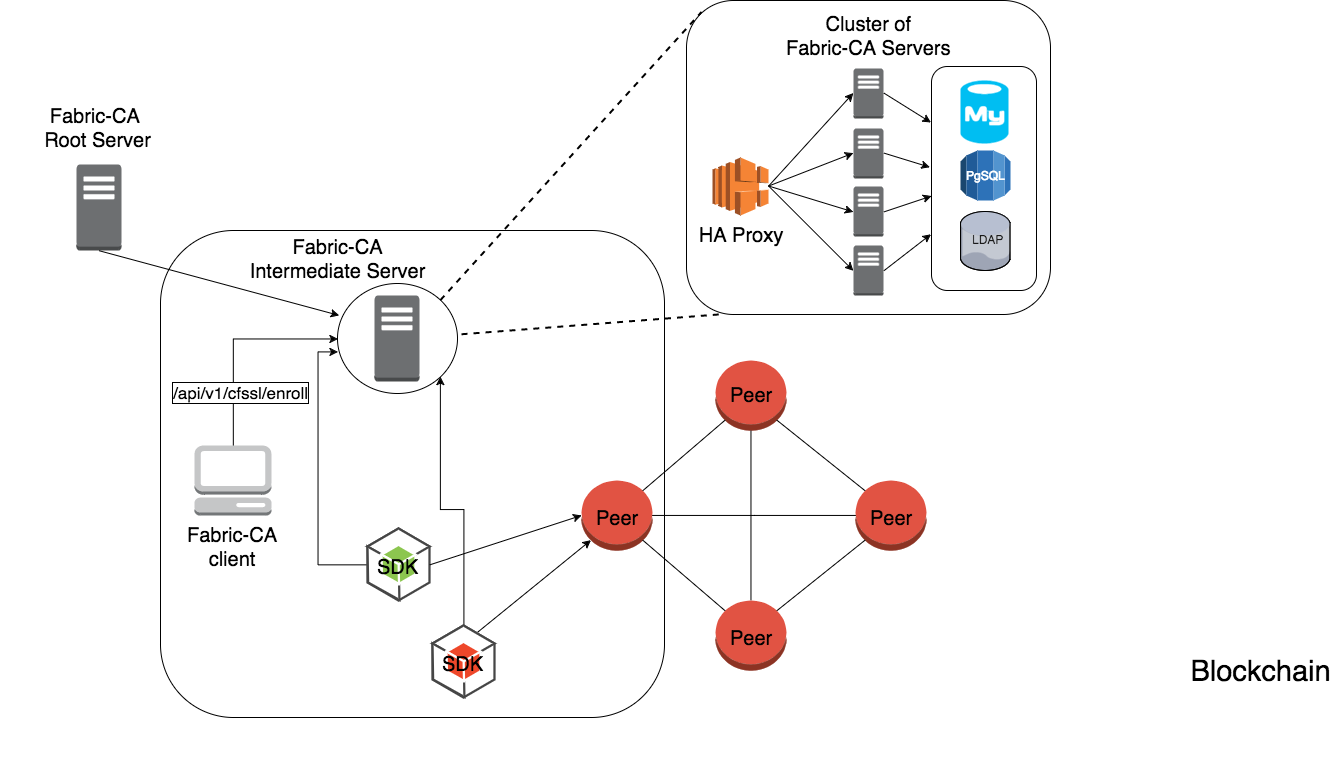
There are two ways of interacting with a Hyperledger Fabric CA server: via the Hyperledger Fabric CA client or through one of the Fabric SDKs. All communication to the Hyperledger Fabric CA server is via REST APIs. See fabric-ca/swagger/swagger-fabric-ca.json for the swagger documentation for these REST APIs. You may view this documentation via the http://editor2.swagger.io online editor.
The Hyperledger Fabric CA client or SDK may connect to a server in a cluster of Hyperledger Fabric CA servers. This is illustrated in the top right section of the diagram. The client routes to an HA Proxy endpoint which load balances traffic to one of the fabric-ca-server cluster members.
All Hyperledger Fabric CA servers in a cluster share the same database for keeping track of identities and certificates. If LDAP is configured, the identity information is kept in LDAP rather than the database.
A server may contain multiple CAs. Each CA is either a root CA or an intermediate CA. Each intermediate CA has a parent CA which is either a root CA or another intermediate CA.
Getting Started
Prerequisites
- Go 1.10+ installation
GOPATHenvironment variable is set correctly- libtool and libtdhl-dev packages are installed
The following installs the libtool dependencies on Ubuntu:
sudo apt install libtool libltdl-dev
The following installs the libtool dependencies on MacOSX:
brew install libtool
Note
libtldl-dev is not necessary on MacOSX if you instal libtool via Homebrew
For more information on libtool, see https://www.gnu.org/software/libtool.
For more information on libltdl-dev, see https://www.gnu.org/software/libtool/manual/html_node/Using-libltdl.html.
Install
The following installs both the fabric-ca-server and fabric-ca-client binaries in $GOPATH/bin.
go get -u github.com/hyperledger/fabric-ca/cmd/...
Note: If you have already cloned the fabric-ca repository, make sure you are on the master branch before running the ‘go get’ command above. Otherwise, you might see the following error:
<gopath>/src/github.com/hyperledger/fabric-ca; git pull --ff-only
There is no tracking information for the current branch.
Please specify which branch you want to merge with.
See git-pull(1) for details.

    git pull <remote> <branch>

If you wish to set tracking information for this branch you can do so with:

    git branch --set-upstream-to=<remote>/<branch> tlsdoc

package github.com/hyperledger/fabric-ca/cmd/fabric-ca-client: exit status 1
Start Server Natively
The following starts the fabric-ca-server with default settings.
fabric-ca-server start -b admin:adminpw
The -b option provides the enrollment ID and secret for a bootstrap administrator; this is required if LDAP is not enabled with the “ldap.enabled” setting.
A default configuration file named fabric-ca-server-config.yaml is created in the local directory which can be customized.
Start Server via Docker
Docker Hub
Go to: https://hub.docker.com/r/hyperledger/fabric-ca/tags/
Find the tag that matches the architecture and version of fabric-ca that you want to pull.
Navigate to $GOPATH/src/github.com/hyperledger/fabric-ca/docker/server and open up docker-compose.yml in an editor.
Change the image line to reflect the tag you found previously. The file may look like this for an x86 architecture for version beta.
fabric-ca-server:
  image: hyperledger/fabric-ca:x86_64-1.0.0-beta
  container_name: fabric-ca-server
  ports:
    - "7054:7054"
  environment:
    - FABRIC_CA_HOME=/etc/hyperledger/fabric-ca-server
  volumes:
    - "./fabric-ca-server:/etc/hyperledger/fabric-ca-server"
  command: sh -c 'fabric-ca-server start -b admin:adminpw'
Open up a terminal in the same directory as the docker-compose.yml file and execute the following:
# docker-compose up -d
This will pull down the specified fabric-ca image in the Compose file if it does not already exist, and start an instance of the fabric-ca server.
Building Your Own Docker image
You can build and start the server via Docker Compose as shown below.
cd $GOPATH/src/github.com/hyperledger/fabric-ca
make docker
cd docker/server
docker-compose up -d
The hyperledger/fabric-ca Docker image contains both the fabric-ca-server and the fabric-ca-client.
# cd $GOPATH/src/github.com/hyperledger/fabric-ca
# FABRIC_CA_DYNAMIC_LINK=true make docker
# cd docker/server
# docker-compose up -d
Explore the Fabric CA CLI
This section simply provides the usage messages for the Fabric CA server and client for convenience. Additional usage information is provided in following sections.
The following links shows the Server Command Line and Client Command Line.
Note
Note that command line options that are string slices (lists) can be
specified either by specifying the option with comma-separated list
elements or by specifying the option multiple times, each with a
string value that make up the list. For example, to specify
host1 and host2 for the csr.hosts option, you can either
pass --csr.hosts 'host1,host2' or
--csr.hosts host1 --csr.hosts host2. When using the former format,
please make sure there are no space before or after any commas.
Configuration Settings
The Fabric CA provides 3 ways to configure settings on the Fabric CA server and client. The precedence order is:
- CLI flags
- Environment variables
- Configuration file
In the remainder of this document, we refer to making changes to configuration files. However, configuration file changes can be overridden through environment variables or CLI flags.
For example, if we have the following in the client configuration file:
tls:
  # Enable TLS (default: false)
  enabled: false

  # TLS for the client's listenting port (default: false)
  certfiles:
  client:
    certfile: cert.pem
    keyfile:
The following environment variable may be used to override the cert.pem
setting in the configuration file:
export FABRIC_CA_CLIENT_TLS_CLIENT_CERTFILE=cert2.pem
If we wanted to override both the environment variable and configuration file, we can use a command line flag.
fabric-ca-client enroll --tls.client.certfile cert3.pem
The same approach applies to fabric-ca-server, except instead of using
FABIRC_CA_CLIENT as the prefix to environment variables,
FABRIC_CA_SERVER is used.
A word on file paths
All the properties in the Fabric CA server and client configuration file
that specify file names support both relative and absolute paths.
Relative paths are relative to the config directory, where the
configuration file is located. For example, if the config directory is
~/config and the tls section is as shown below, the Fabric CA server
or client will look for the root.pem file in the ~/config
directory, cert.pem file in the ~/config/certs directory and the
key.pem file in the /abs/path directory
tls:
  enabled: true
  certfiles:
    - root.pem
  client:
    certfile: certs/cert.pem
    keyfile: /abs/path/key.pem
Fabric CA Server
This section describes the Fabric CA server.
You may initialize the Fabric CA server before starting it. This provides an opportunity for you to generate a default configuration file that can be reviewed and customized before starting the server.
- The Fabric CA server’s home directory is determined as follows:
- if the –home command line option is set, use its value
- otherwise, if the
FABRIC_CA_SERVER_HOMEenvironment variable is set, use its value - otherwise, if
FABRIC_CA_HOMEenvironment variable is set, use its value - otherwise, if the
CA_CFG_PATHenvironment variable is set, use its value - otherwise, use current working directory
For the remainder of this server section, we assume that you have set
the FABRIC_CA_HOME environment variable to
$HOME/fabric-ca/server.
The instructions below assume that the server configuration file exists in the server’s home directory.
Initializing the server
Initialize the Fabric CA server as follows:
fabric-ca-server init -b admin:adminpw
The -b (bootstrap identity) option is required for initialization when
LDAP is disabled. At least one bootstrap identity is required to start the
Fabric CA server; this identity is the server administrator.
The server configuration file contains a Certificate Signing Request (CSR) section that can be configured. The following is a sample CSR.
cn: fabric-ca-server
names:
   - C: US
     ST: "North Carolina"
     L:
     O: Hyperledger
     OU: Fabric
hosts:
  - host1.example.com
  - localhost
ca:
   expiry: 131400h
   pathlength: 1
All of the fields above pertain to the X.509 signing key and certificate which
is generated by the fabric-ca-server init. This corresponds to the
ca.certfile and ca.keyfile files in the server’s configuration file.
The fields are as follows:
- cn is the Common Name
- O is the organization name
- OU is the organizational unit
- L is the location or city
- ST is the state
- C is the country
If custom values for the CSR are required, you may customize the configuration
file, delete the files specified by the ca.certfile and ca.keyfile
configuration items, and then run the fabric-ca-server init -b admin:adminpw
command again.
The fabric-ca-server init command generates a self-signed CA certificate
unless the -u <parent-fabric-ca-server-URL> option is specified.
If the -u is specified, the server’s CA certificate is signed by the
parent Fabric CA server.
In order to authenticate to the parent Fabric CA server, the URL must
be of the form <scheme>://<enrollmentID>:<secret>@<host>:<port>, where
<enrollmentID> and <secret> correspond to an identity with an ‘hf.IntermediateCA’
attribute whose value equals ‘true’.
The fabric-ca-server init command also generates a default configuration
file named fabric-ca-server-config.yaml in the server’s home directory.
If you want the Fabric CA server to use a CA signing certificate and key file which you provide,
you must place your files in the location referenced by ca.certfile and ca.keyfile respectively.
Both files must be PEM-encoded and must not be encrypted.
More specifically, the contents of the CA certificate file must begin with -----BEGIN CERTIFICATE-----
and the contents of the key file must begin with -----BEGIN PRIVATE KEY----- and not
-----BEGIN ENCRYPTED PRIVATE KEY-----.
Algorithms and key sizes
The CSR can be customized to generate X.509 certificates and keys that
support Elliptic Curve (ECDSA). The following setting is an
example of the implementation of Elliptic Curve Digital Signature
Algorithm (ECDSA) with curve prime256v1 and signature algorithm
ecdsa-with-SHA256:
key:
   algo: ecdsa
   size: 256
The choice of algorithm and key size are based on security needs.
Elliptic Curve (ECDSA) offers the following key size options:
| size | ASN1 OID | Signature Algorithm |
|---|---|---|
| 256 | prime256v1 | ecdsa-with-SHA256 |
| 384 | secp384r1 | ecdsa-with-SHA384 |
| 521 | secp521r1 | ecdsa-with-SHA512 |
Starting the server
Start the Fabric CA server as follows:
fabric-ca-server start -b <admin>:<adminpw>
If the server has not been previously initialized, it will initialize itself as it starts for the first time. During this initialization, the server will generate the ca-cert.pem and ca-key.pem files if they don’t yet exist and will also create a default configuration file if it does not exist. See the Initialize the Fabric CA server section.
Unless the Fabric CA server is configured to use LDAP, it must be
configured with at least one pre-registered bootstrap identity to enable you
to register and enroll other identities. The -b option specifies the
name and password for a bootstrap identity.
To cause the Fabric CA server to listen on https rather than
http, set tls.enabled to true.
SECURITY WARNING: The Fabric CA server should always be started with TLS
enabled (tls.enabled set to true). Failure to do so leaves the
server vulnerable to an attacker with access to network traffic.
To limit the number of times that the same secret (or password) can be
used for enrollment, set the registry.maxenrollments in the configuration
file to the appropriate value. If you set the value to 1, the Fabric CA
server allows passwords to only be used once for a particular enrollment
ID. If you set the value to -1, the Fabric CA server places no limit on
the number of times that a secret can be reused for enrollment. The
default value is -1. Setting the value to 0, the Fabric CA server will
disable enrollment for all identities and registration of identities will
not be allowed.
The Fabric CA server should now be listening on port 7054.
You may skip to the Fabric CA Client section if you do not want to configure the Fabric CA server to run in a cluster or to use LDAP.
Configuring the database
This section describes how to configure the Fabric CA server to connect
to PostgreSQL or MySQL databases. The default database is SQLite and the
default database file is fabric-ca-server.db in the Fabric CA
server’s home directory.
If you don’t care about running the Fabric CA server in a cluster, you may skip this section; otherwise, you must configure either PostgreSQL or MySQL as described below. Fabric CA supports the following database versions in a cluster setup:
- PostgreSQL: 9.5.5 or later
- MySQL: 5.7 or later
PostgreSQL
The following sample may be added to the server’s configuration file in order to connect to a PostgreSQL database. Be sure to customize the various values appropriately. There are limitations on what characters are allowed in the database name. Please refer to the following Postgres documentation for more information: https://www.postgresql.org/docs/current/static/sql-syntax-lexical.html#SQL-SYNTAX-IDENTIFIERS
db:
  type: postgres
  datasource: host=localhost port=5432 user=Username password=Password dbname=fabric_ca sslmode=verify-full
Specifying sslmode configures the type of SSL authentication. Valid values for sslmode are:
| Mode | Description |
|---|---|
| disable | No SSL |
| require | Always SSL (skip verification) |
| verify-ca | Always SSL (verify that the certificate presented by the server was signed by a trusted CA) |
| verify-full | Same as verify-ca AND verify that the certificate presented by the server was signed by a trusted CA and the server hostname matches the one in the certificate |
If you would like to use TLS, then the db.tls section in the Fabric CA server
configuration file must be specified. If SSL client authentication is enabled
on the PostgreSQL server, then the client certificate and key file must also be
specified in the db.tls.client section. The following is an example
of the db.tls section:
db:
  ...
  tls:
      enabled: true
      certfiles:
        - db-server-cert.pem
      client:
            certfile: db-client-cert.pem
            keyfile: db-client-key.pem
PostgreSQL SSL Configuration
Basic instructions for configuring SSL on the PostgreSQL server:
- In postgresql.conf, uncomment SSL and set to “on” (SSL=on)
- Place certificate and key files in the PostgreSQL data directory.
Instructions for generating self-signed certificates for: https://www.postgresql.org/docs/9.5/static/ssl-tcp.html
Note: Self-signed certificates are for testing purposes and should not be used in a production environment
PostgreSQL Server - Require Client Certificates
- Place certificates of the certificate authorities (CAs) you trust in the file root.crt in the PostgreSQL data directory
- In postgresql.conf, set “ssl_ca_file” to point to the root cert of the client (CA cert)
- Set the clientcert parameter to 1 on the appropriate hostssl line(s) in pg_hba.conf.
For more details on configuring SSL on the PostgreSQL server, please refer to the following PostgreSQL documentation: https://www.postgresql.org/docs/9.4/static/libpq-ssl.html
MySQL
The following sample may be added to the Fabric CA server configuration file in order to connect to a MySQL database. Be sure to customize the various values appropriately. There are limitations on what characters are allowed in the database name. Please refer to the following MySQL documentation for more information: https://dev.mysql.com/doc/refman/5.7/en/identifiers.html
On MySQL 5.7.X, certain modes affect whether the server permits ‘0000-00-00’ as a valid date. It might be necessary to relax the modes that MySQL server uses. We want to allow the server to be able to accept zero date values.
In my.cnf, find the configuration option sql_mode and remove NO_ZERO_DATE if present. Restart MySQL server after making this change.
Please refer to the following MySQL documentation on different modes available and select the appropriate settings for the specific version of MySQL that is being used.
https://dev.mysql.com/doc/refman/5.7/en/sql-mode.html
db:
  type: mysql
  datasource: root:rootpw@tcp(localhost:3306)/fabric_ca?parseTime=true&tls=custom
If connecting over TLS to the MySQL server, the db.tls.client
section is also required as described in the PostgreSQL section above.
MySQL SSL Configuration
Basic instructions for configuring SSL on MySQL server:
Open or create my.cnf file for the server. Add or uncomment the lines below in the [mysqld] section. These should point to the key and certificates for the server, and the root CA cert.
Instructions on creating server and client-side certficates: http://dev.mysql.com/doc/refman/5.7/en/creating-ssl-files-using-openssl.html
[mysqld] ssl-ca=ca-cert.pem ssl-cert=server-cert.pem ssl-key=server-key.pem
Can run the following query to confirm SSL has been enabled.
mysql> SHOW GLOBAL VARIABLES LIKE ‘have_%ssl’;
Should see:
Variable_name Value have_openssl YES have_ssl YES After the server-side SSL configuration is finished, the next step is to create a user who has a privilege to access the MySQL server over SSL. For that, log in to the MySQL server, and type:
mysql> GRANT ALL PRIVILEGES ON . TO ‘ssluser’@’%’ IDENTIFIED BY ‘password’ REQUIRE SSL; mysql> FLUSH PRIVILEGES;
If you want to give a specific IP address from which the user will access the server change the ‘%’ to the specific IP address.
MySQL Server - Require Client Certificates
Options for secure connections are similar to those used on the server side.
- ssl-ca identifies the Certificate Authority (CA) certificate. This option, if used, must specify the same certificate used by the server.
- ssl-cert identifies MySQL server’s certificate.
- ssl-key identifies MySQL server’s private key.
Suppose that you want to connect using an account that has no special
encryption requirements or was created using a GRANT statement that
includes the REQUIRE SSL option. As a recommended set of
secure-connection options, start the MySQL server with at least
–ssl-cert and –ssl-key options. Then set the db.tls.certfiles property
in the server configuration file and start the Fabric CA server.
To require that a client certificate also be specified, create the
account using the REQUIRE X509 option. Then the client must also specify
proper client key and certificate files; otherwise, the MySQL server
will reject the connection. To specify client key and certificate files
for the Fabric CA server, set the db.tls.client.certfile,
and db.tls.client.keyfile configuration properties.
Configuring LDAP
The Fabric CA server can be configured to read from an LDAP server.
In particular, the Fabric CA server may connect to an LDAP server to do the following:
- authenticate an identity prior to enrollment
- retrieve an identity’s attribute values which are used for authorization.
Modify the LDAP section of the Fabric CA server’s configuration file to configure the server to connect to an LDAP server.
ldap:
   # Enables or disables the LDAP client (default: false)
   enabled: false
   # The URL of the LDAP server
   url: <scheme>://<adminDN>:<adminPassword>@<host>:<port>/<base>
   userfilter: <filter>
   attribute:
      # 'names' is an array of strings that identify the specific attributes
      # which are requested from the LDAP server.
      names: <LDAPAttrs>
      # The 'converters' section is used to convert LDAP attribute values
      # to fabric CA attribute values.
      #
      # For example, the following converts an LDAP 'uid' attribute
      # whose value begins with 'revoker' to a fabric CA attribute
      # named "hf.Revoker" with a value of "true" (because the expression
      # evaluates to true).
      #    converters:
      #       - name: hf.Revoker
      #         value: attr("uid") =~ "revoker*"
      #
      # As another example, assume a user has an LDAP attribute named
      # 'member' which has multiple values of "dn1", "dn2", and "dn3".
      # Further assume the following configuration.
      #    converters:
      #       - name: myAttr
      #         value: map(attr("member"),"groups")
      #    maps:
      #       groups:
      #          - name: dn1
      #            value: client
      #          - name: dn2
      #            value: peer
      # The value of the user's 'myAttr' attribute is then computed to be
      # "client,peer,dn3".  This is because the value of 'attr("member")' is
      # "dn1,dn2,dn3", and the call to 'map' with a 2nd argument of
      # "group" replaces "dn1" with "client" and "dn2" with "peer".
      converters:
        - name: <fcaAttrName>
          value: <fcaExpr>
      maps:
        <mapName>:
            - name: <from>
              value: <to>
Where:
schemeis one of ldap or ldaps;adminDNis the distinquished name of the admin user;passis the password of the admin user;hostis the hostname or IP address of the LDAP server;portis the optional port number, where default 389 for ldap and 636 for ldaps;baseis the optional root of the LDAP tree to use for searches;filteris a filter to use when searching to convert a login user name to a distinguished name. For example, a value of(uid=%s)searches for LDAP entries with the value of auidattribute whose value is the login user name. Similarly,(email=%s)may be used to login with an email address.LDAPAttrsis an array of LDAP attribute names to request from the LDAP server on a user’s behalf;- the attribute.converters section is used to convert LDAP attributes to fabric CA attributes, where *
fcaAttrNameis the name of a fabric CA attribute; *fcaExpris an expression whose evaluated value is assigned to the fabric CA attribute. For example, suppose that <LDAPAttrs> is [“uid”], <fcaAttrName> is ‘hf.Revoker’, and <fcaExpr> is ‘attr(“uid”) =~ “revoker*”’. This means that an attribute named “uid” is requested from the LDAP server on a user’s behalf. The user is then given a value of ‘true’ for the ‘hf.Revoker’ attribute if the value of the user’s ‘uid’ LDAP attribute begins with ‘revoker’; otherwise, the user is given a value of ‘false’ for the ‘hf.Revoker’ attribute.- the attribute.maps section is used to map LDAP response values. The typical use case is to map a distinguished name associated with an LDAP group to an identity type.
The LDAP expression language uses the govaluate package as described at https://github.com/Knetic/govaluate/blob/master/MANUAL.md. This defines operators such as “=~” and literals such as “revoker*”, which is a regular expression. The LDAP-specific variables and functions which extend the base govaluate language are as follows:
DNis a variable equal to the user’s distinguished name.affiliationis a variable equal to the user’s affiliation.attris a function which takes 1 or 2 arguments. The 1st argument is an LDAP attribute name. The 2nd argument is a separator string which is used to join multiple values into a single string; the default separator string is ”,”. Theattrfunction always returns a value of type ‘string’.mapis a function which takes 2 arguments. The 1st argument is any string. The second argument is the name of a map which is used to perform string substitution on the string from the 1st argument.ifis a function which takes a 3 arguments where the first argument must resolve to a boolean value. If it evaluates to true, the second argument is returned; otherwise, the third argument is returned.
For example, the following expression evaluates to true if the user has a distinguished name ending in “O=org1,C=US”, or if the user has an affiliation beginning with “org1.dept2.” and also has the “admin” attribute of “true”.
DN =~ “*O=org1,C=US” || (affiliation =~ “org1.dept2.*” && attr(‘admin’) = ‘true’)
NOTE: Since the attr function always returns a value of type ‘string’,
numeric operators may not be used to construct expressions.
For example, the following is NOT a valid expression:
value: attr("gidNumber) >= 10000 && attr("gidNumber) < 10006
Alternatively, a regular expression enclosed in quotes as shown below may be used to return an equivalent result:
value: attr("gidNumber") =~ "1000[0-5]$" || attr("mail") == "root@example.com"
The following is a sample configuration section for the default setting
for the OpenLDAP server whose Docker image is at
https://github.com/osixia/docker-openldap.
ldap:
   enabled: true
   url: ldap://cn=admin,dc=example,dc=org:admin@localhost:10389/dc=example,dc=org
   userfilter: (uid=%s)
See FABRIC_CA/scripts/run-ldap-tests for a script which starts an
OpenLDAP Docker image, configures it, runs the LDAP tests in
FABRIC_CA/cli/server/ldap/ldap_test.go, and stops the OpenLDAP
server.
When LDAP is configured, enrollment works as follows:
- The Fabric CA client or client SDK sends an enrollment request with a basic authorization header.
- The Fabric CA server receives the enrollment request, decodes the identity name and password in the authorization header, looks up the DN (Distinguished Name) associated with the identity name using the “userfilter” from the configuration file, and then attempts an LDAP bind with the identity’s password. If the LDAP bind is successful, the enrollment processing is authorized and can proceed.
Setting up a cluster
You may use any IP sprayer to load balance to a cluster of Fabric CA servers. This section provides an example of how to set up Haproxy to route to a Fabric CA server cluster. Be sure to change hostname and port to reflect the settings of your Fabric CA servers.
haproxy.conf
global
      maxconn 4096
      daemon

defaults
      mode http
      maxconn 2000
      timeout connect 5000
      timeout client 50000
      timeout server 50000

listen http-in
      bind *:7054
      balance roundrobin
      server server1 hostname1:port
      server server2 hostname2:port
      server server3 hostname3:port
Note: If using TLS, need to use mode tcp.
Setting up multiple CAs
The fabric-ca server by default consists of a single default CA. However, additional CAs can be added to a single server by using cafiles or cacount configuration options. Each additional CA will have its own home directory.
cacount:
The cacount provides a quick way to start X number of default additional CAs. The home directory will be relative to the server directory. With this option, the directory structure will be as follows:
--<Server Home>
  |--ca
    |--ca1
    |--ca2
Each additional CA will get a default configuration file generated in it’s home directory, within the configuration file it will contain a unique CA name.
For example, the following command will start 2 default CA instances:
fabric-ca-server start -b admin:adminpw --cacount 2
cafiles:
If absolute paths are not provided when using the cafiles configuration option, the CA home directory will be relative to the server directory.
To use this option, CA configuration files must have already been generated and configured for each CA that is to be started. Each configuration file must have a unique CA name and Common Name (CN), otherwise the server will fail to start as these names must be unique. The CA configuration files will override any default CA configuration, and any missing options in the CA configuration files will be replaced by the values from the default CA.
The precedence order will be as follows:
- CA Configuration file
- Default CA CLI flags
- Default CA Environment variables
- Default CA Configuration file
A CA configuration file must contain at least the following:
ca:
# Name of this CA
name: <CANAME>

csr:
  cn: <COMMONNAME>
You may configure your directory structure as follows:
--<Server Home>
  |--ca
    |--ca1
      |-- fabric-ca-config.yaml
    |--ca2
      |-- fabric-ca-config.yaml
For example, the following command will start two customized CA instances:
fabric-ca-server start -b admin:adminpw --cafiles ca/ca1/fabric-ca-config.yaml
--cafiles ca/ca2/fabric-ca-config.yaml
Enrolling an intermediate CA
In order to create a CA signing certificate for an intermediate CA, the intermediate CA must enroll with a parent CA in the same way that a fabric-ca-client enrolls with a CA. This is done by using the -u option to specify the URL of the parent CA and the enrollment ID and secret as shown below. The identity associated with this enrollment ID must have an attribute with a name of “hf.IntermediateCA” and a value of “true”. The CN (or Common Name) of the issued certificate will be set to the enrollment ID. An error will occur if an intermediate CA tries to explicitly specify a CN value.
fabric-ca-server start -b admin:adminpw -u http://<enrollmentID>:<secret>@<parentserver>:<parentport>
For other intermediate CA flags see Fabric CA server’s configuration file format section.
Upgrading the server
The Fabric CA server must be upgraded before upgrading the Fabric CA client. Prior to upgrade, it is suggested that the current database be backed up:
- If using sqlite3, backup the current database file (which is named fabric-ca-server.db by default).
- For other database types, use the appropriate backup/replication mechanism.
To upgrade a single instance of Fabric CA server:
Stop the fabric-ca-server process.
Ensure the current database is backed up.
Replace previous fabric-ca-server binary with the upgraded version.
Launch the fabric-ca-server process.
Verify the fabric-ca-server process is available with the following command where <host> is the hostname on which the server was started:
fabric-ca-client getcainfo -u http://<host>:7054
Upgrading a cluster:
To upgrade a cluster of fabric-ca-server instances using either a MySQL or Postgres database, perform the following procedure. We assume that you are using haproxy to load balance to two fabric-ca-server cluster members on host1 and host2, respectively, both listening on port 7054. After this procedure, you will be load balancing to upgraded fabric-ca-server cluster members on host3 and host4 respectively, both listening on port 7054.
In order to monitor the changes using haproxy stats, enable statistics collection. Add the following lines to the global section of the haproxy configuration file:
stats socket /var/run/haproxy.sock mode 666 level operator
stats timeout 2m
Restart haproxy to pick up the changes:
# haproxy -f <configfile> -st $(pgrep haproxy)
To display summary information from the haproxy “show stat” command, the following function may prove useful for parsing the copious amount of CSV data returned:
haProxyShowStats() {
   echo "show stat" | nc -U /var/run/haproxy.sock |sed '1s/^# *//'|
      awk -F',' -v fmt="%4s %12s %10s %6s %6s %4s %4s\n" '
         { if (NR==1) for (i=1;i<=NF;i++) f[tolower($i)]=i }
         { printf fmt, $f["sid"],$f["pxname"],$f["svname"],$f["status"],
                       $f["weight"],$f["act"],$f["bck"] }'
}
Initially your haproxy configuration file is similar to the following:
server server1 host1:7054 check
server server2 host2:7054 check
Change this configuration to the following:
server server1 host1:7054 check backup
server server2 host2:7054 check backup
server server3 host3:7054 check
server server4 host4:7054 check
Restart the HA proxy with the new configuration as follows:
haproxy -f <configfile> -st $(pgrep haproxy)
"haProxyShowStats"will now reflect the modified configuration, with two active, older-version backup servers and two (yet to be started) upgraded servers:sid pxname svname status weig act bck 1 fabric-cas server3 DOWN 1 1 0 2 fabric-cas server4 DOWN 1 1 0 3 fabric-cas server1 UP 1 0 1 4 fabric-cas server2 UP 1 0 1
Install upgraded binaries of fabric-ca-server on host3 and host4. The new upgraded servers on host3 and host4 should be configured to use the same database as their older counterparts on host1 and host2. After starting the upgraded servers, the database will be automatically migrated. The haproxy will forward all new traffic to the upgraded servers, since they are not configured as backup servers. Verify using the
"fabric-ca-client getcainfo"command that your cluster is still functioning appropriately before proceeding. Also,"haProxyShowStats"should now reflect that all servers are active, similar to the following:sid pxname svname status weig act bck 1 fabric-cas server3 UP 1 1 0 2 fabric-cas server4 UP 1 1 0 3 fabric-cas server1 UP 1 0 1 4 fabric-cas server2 UP 1 0 1
Stop the old servers on host1 and host2. Verify using the
"fabric-ca-client getcainfo"command that your new cluster is still functioning appropriately before proceeding. Then remove the older server backup configuration from the haproxy configuration file, so that it looks similar to the following:server server3 host3:7054 check server server4 host4:7054 check
Restart the HA proxy with the new configuration as follows:
haproxy -f <configfile> -st $(pgrep haproxy)
"haProxyShowStats"will now reflect the modified configuration, with two active servers which have been upgraded to the new version:sid pxname svname status weig act bck 1 fabric-cas server3 UP 1 1 0 2 fabric-cas server4 UP 1 1 0
Operations Service
The CA Server hosts an HTTP server that offers a RESTful “operations” API. This API is intended to be used by operators, not administrators or “users” of the network.
The API exposes the following capabilities:
Prometheus target for operational metrics (when configured)
Configuring the Operations Service
The operations service requires two basic pieces of configuration:
The address and port to listen on. The TLS certificates and keys to use for authentication and encryption. Note, these certificates should be generated by a separate and dedicated CA. Do not use a CA that has generated certificates for any organizations in any channels.
The CA server can be configurated in the operations section of server’s configuration file:
operations:
  # host and port for the operations server
  listenAddress: 127.0.0.1:9443

  # TLS configuration for the operations endpoint
  tls:
    # TLS enabled
    enabled: true

    # path to PEM encoded server certificate for the operations server
    cert:
      file: tls/server.crt

    # path to PEM encoded server key for the operations server
    key:
      file: tls/server.key

    # require client certificate authentication to access all resources
    clientAuthRequired: false

    # paths to PEM encoded ca certificates to trust for client authentication
    clientRootCAs:
      files: []
The listenAddress key defines the host and port that the operation server
will listen on. If the server should listen on all addresses, the host portion
can be omitted.
The tls section is used to indicate whether or not TLS is enabled for the
operations service, the location of the service’s certificate and private key,
and the locations of certificate authority root certificates that should be
trusted for client authentication. When clientAuthRequired is true,
clients will be required to provide a certificate for authentication.
Operations Security
As the operations service is focused on operations and intentionally unrelated to the Fabric network, it does not use the Membership Services Provider for access control. Instead, the operations service relies entirely on mutual TLS with client certificate authentication.
It is highly recommended to enable mutual TLS by setting the value of clientAuthRequired
to true in production environments. With this configuration, clients are
required to provide a valid certificate for authentication. If the client does
not provide a certificate or the service cannot verify the client’s certificate,
the request is rejected. Note that if clientAuthRequired is set to false,
clients do not need to provide a certificate; if they do, however, and the service
cannot verify the certificate, then the request will be rejected.
When TLS is disabled, authorization is bypassed and any client that can connect to the operations endpoint will be able to use the API.
Metrics
The Fabric CA exposes metrics that can provide insight into the behavior of the system. Operators and administrators can use this information to better understand how the system is performing over time.
Configuring Metrics
Fabric CA provides two ways to expose metrics: a pull model based on Prometheus and a push model based on StatsD.
Prometheus
A typical Prometheus deployment scrapes metrics by requesting them from an HTTP endpoint exposed by instrumented targets. As Prometheus is responsible for requesting the metrics, it is considered a pull system.
When configured, a Fabric CA Server will present a /metrics resource
on the operations service. To enable Prometheus, set the provider value in the
server’s configuration file to prometheus.
metrics:
  provider: prometheus
StatsD
StatsD is a simple statistics aggregation daemon. Metrics are sent to a
statsd daemon where they are collected, aggregated, and pushed to a backend
for visualization and alerting. As this model requires instrumented processes
to send metrics data to StatsD, this is considered a push system.
The CA Server can be configured to send metrics to StatsD by setting the metrics
provider to statsd in the metrics section in servers’ configuration filel. The statsd
subsection must also be configured with the address of the StatsD daemon, the
network type to use (tcp or udp), and how often to send the metrics. An
optional prefix may be specified to help differentiate the source of the
metrics — for example, differentiating metrics coming from separate servers —
that would be prepended to all generated metrics.
metrics:
  provider: statsd
  statsd:
    network: udp
    address: 127.0.0.1:8125
    writeInterval: 10s
    prefix: server-0
For a look at the different metrics that are generated, check out Metrics Reference.
Fabric CA Client
This section describes how to use the fabric-ca-client command.
- The Fabric CA client’s home directory is determined as follows:
- if the –home command line option is set, use its value
- otherwise, if the
FABRIC_CA_CLIENT_HOMEenvironment variable is set, use its value - otherwise, if the
FABRIC_CA_HOMEenvironment variable is set, use its value - otherwise, if the
CA_CFG_PATHenvironment variable is set, use its value - otherwise, use
$HOME/.fabric-ca-client
The instructions below assume that the client configuration file exists in the client’s home directory.
Enrolling the bootstrap identity
First, if needed, customize the CSR (Certificate Signing Request) section
in the client configuration file. Note that csr.cn field must be set
to the ID of the bootstrap identity. Default CSR values are shown below:
csr:
  cn: <<enrollment ID>>
  key:
    algo: ecdsa
    size: 256
  names:
    - C: US
      ST: North Carolina
      L:
      O: Hyperledger Fabric
      OU: Fabric CA
  hosts:
   - <<hostname of the fabric-ca-client>>
  ca:
    pathlen:
    pathlenzero:
    expiry:
See CSR fields for description of the fields.
Then run fabric-ca-client enroll command to enroll the identity. For example,
following command enrolls an identity whose ID is admin and password is adminpw
by calling Fabric CA server that is running locally at 7054 port.
export FABRIC_CA_CLIENT_HOME=$HOME/fabric-ca/clients/admin
fabric-ca-client enroll -u http://admin:adminpw@localhost:7054
The enroll command stores an enrollment certificate (ECert), corresponding private key and CA
certificate chain PEM files in the subdirectories of the Fabric CA client’s msp directory.
You will see messages indicating where the PEM files are stored.
Registering a new identity
The identity performing the register request must be currently enrolled, and must also have the proper authority to register the type of the identity that is being registered.
In particular, three authorization checks are made by the Fabric CA server during registration as follows:
- The registrar (i.e. the invoker) must have the “hf.Registrar.Roles” attribute with a comma-separated list of values where one of the values equals the type of identity being registered; for example, if the registrar has the “hf.Registrar.Roles” attribute with a value of “peer”, the registrar can register identities of type peer, but not client, admin, or orderer.
- The affiliation of the registrar must be equal to or a prefix of the affiliation of the identity being registered. For example, an registrar with an affiliation of “a.b” may register an identity with an affiliation of “a.b.c” but may not register an identity with an affiliation of “a.c”. If root affiliation is required for an identity, then the affiliation request should be a dot (”.”) and the registrar must also have root affiliation. If no affiliation is specified in the registration request, the identity being registered will be given the affiliation of the registrar.
- The registrar can register an identity with attributes if all of the following conditions
are satisfied:
- Registrar can register Fabric CA reserved attributes that have the prefix ‘hf.’ only if the registrar possesses the attribute and it is part of the value of the hf.Registrar.Attributes’ attribute. Furthermore, if the attribute is of type list then the value of attribute being registered must be equal to or a subset of the value that the registrar has. If the attribute is of type boolean, the registrar can register the attribute only if the registrar’s value for the attribute is ‘true’.
- Registering custom attributes (i.e. any attribute whose name does not begin with ‘hf.’) requires that the registrar has the ‘hf.Registar.Attributes’ attribute with the value of the attribute or pattern being registered. The only supported pattern is a string with a “*” at the end. For example, “a.b.*” is a pattern which matches all attribute names beginning with “a.b.”. For example, if the registrar has hf.Registrar.Attributes=orgAdmin, then the only attribute which the registrar can add or remove from an identity is the ‘orgAdmin’ attribute.
- If the requested attribute name is ‘hf.Registrar.Attributes’, an additional check is performed to see if the requested values for this attribute are equal to or a subset of the registrar’s values for ‘hf.Registrar.Attributes’. For this to be true, each requested value must match a value in the registrar’s value for ‘hf.Registrar.Attributes’ attribute. For example, if the registrar’s value for ‘hf.Registrar.Attributes’ is ‘a.b.*, x.y.z’ and the requested attribute value is ‘a.b.c, x.y.z’, it is valid because ‘a.b.c’ matches ‘a.b.*’ and ‘x.y.z’ matches the registrar’s ‘x.y.z’ value.
- Examples:
- Valid Scenarios:
- If the registrar has the attribute ‘hf.Registrar.Attributes = a.b.*, x.y.z’ and is registering attribute ‘a.b.c’, it is valid ‘a.b.c’ matches ‘a.b.*’.
- If the registrar has the attribute ‘hf.Registrar.Attributes = a.b.*, x.y.z’ and is registering attribute ‘x.y.z’, it is valid because ‘x.y.z’ matches the registrar’s ‘x.y.z’ value.
- If the registrar has the attribute ‘hf.Registrar.Attributes = a.b.*, x.y.z’ and the requested attribute value is ‘a.b.c, x.y.z’, it is valid because ‘a.b.c’ matches ‘a.b.*’ and ‘x.y.z’ matches the registrar’s ‘x.y.z’ value.
- If the registrar has the attribute ‘hf.Registrar.Roles = peer,client,admin,orderer’ and the requested attribute value is ‘peer’, ‘peer,client,admin,orderer’, or ‘client,admin’, it is valid because the requested value is equal to or a subset of the registrar’s value.
- Invalid Scenarios:
- If the registrar has the attribute ‘hf.Registrar.Attributes = a.b.*, x.y.z’ and is registering attribute ‘hf.Registar.Attributes = a.b.c, x.y.*’, it is invalid because requested attribute ‘x.y.*’ is not a pattern owned by the registrar. The value ‘x.y.*’ is a superset of ‘x.y.z’.
- If the registrar has the attribute ‘hf.Registrar.Attributes = a.b.*, x.y.z’ and is registering attribute ‘hf.Registar.Attributes = a.b.c, x.y.z, attr1’, it is invalid because the registrar’s ‘hf.Registrar.Attributes’ attribute values do not contain ‘attr1’.
- If the registrar has the attribute ‘hf.Registrar.Attributes = a.b.*, x.y.z’ and is registering attribute ‘a.b’, it is invalid because the value ‘a.b’ is not contained in ‘a.b.*’.
- If the registrar has the attribute ‘hf.Registrar.Attributes = a.b.*, x.y.z’ and is registering attribute ‘x.y’, it is invalid because ‘x.y’ is not contained by ‘x.y.z’.
- If the registrar has the attribute ‘hf.Registrar.Roles = peer’ and the requested attribute value is ‘peer,client’, it is invalid because the registrar does not have the client role in its value of hf.Registrar.Roles attribute.
- If the registrar has the attribute ‘hf.Revoker = false’ and the requested attribute value is ‘true’, it is invalid because the hf.Revoker attribute is a boolean attribute and the registrar’s value for the attribute is not ‘true’.
The table below lists all the attributes that can be registered for an identity. The names of attributes are case sensitive.
Note: When registering an identity, you specify an array of attribute names and values. If the array specifies multiple array elements with the same name, only the last element is currently used. In other words, multi-valued attributes are not currently supported.
The following command uses the admin identity’s credentials to register a new identity with an enrollment id of “admin2”, an affiliation of “org1.department1”, an attribute named “hf.Revoker” with a value of “true”, and an attribute named “admin” with a value of “true”. The ”:ecert” suffix means that by default the “admin” attribute and its value will be inserted into the identity’s enrollment certificate, which can then be used to make access control decisions.
export FABRIC_CA_CLIENT_HOME=$HOME/fabric-ca/clients/admin
fabric-ca-client register --id.name admin2 --id.affiliation org1.department1 --id.attrs 'hf.Revoker=true,admin=true:ecert'
The password, also known as the enrollment secret, is printed. This password is required to enroll the identity. This allows an administrator to register an identity and give the enrollment ID and the secret to someone else to enroll the identity.
Multiple attributes can be specified as part of the –id.attrs flag, each attribute must be comma separated. For an attribute value that contains a comma, the attribute must be encapsulated in double quotes. See example below.
fabric-ca-client register -d --id.name admin2 --id.affiliation org1.department1 --id.attrs '"hf.Registrar.Roles=peer,client",hf.Revoker=true'
or
fabric-ca-client register -d --id.name admin2 --id.affiliation org1.department1 --id.attrs '"hf.Registrar.Roles=peer,client"' --id.attrs hf.Revoker=true
You may set default values for any of the fields used in the register command by editing the client’s configuration file. For example, suppose the configuration file contains the following:
id:
  name:
  type: client
  affiliation: org1.department1
  maxenrollments: -1
  attributes:
    - name: hf.Revoker
      value: true
    - name: anotherAttrName
      value: anotherAttrValue
The following command would then register a new identity with an enrollment id of “admin3” which it takes from the command line, and the remainder is taken from the configuration file including the identity type: “client”, affiliation: “org1.department1”, and two attributes: “hf.Revoker” and “anotherAttrName”.
export FABRIC_CA_CLIENT_HOME=$HOME/fabric-ca/clients/admin
fabric-ca-client register --id.name admin3
To register an identity with multiple attributes requires specifying all attribute names and values in the configuration file as shown above.
Setting maxenrollments to 0 or leaving it out from the configuration will result in the identity being registered to use the CA’s max enrollment value. Furthermore, the max enrollment value for an identity being registered cannot exceed the CA’s max enrollment value. For example, if the CA’s max enrollment value is 5. Any new identity must have a value less than or equal to 5, and also can’t set it to -1 (infinite enrollments).
Next, let’s register a peer identity which will be used to enroll the peer in the following section. The following command registers the peer1 identity. Note that we choose to specify our own password (or secret) rather than letting the server generate one for us.
export FABRIC_CA_CLIENT_HOME=$HOME/fabric-ca/clients/admin
fabric-ca-client register --id.name peer1 --id.type peer --id.affiliation org1.department1 --id.secret peer1pw
Note that affiliations are case sensitive except for the non-leaf affiliations that are specified in the server configuration file, which are always stored in lower case. For example, if the affiliations section of the server configuration file looks like this:
affiliations:
  BU1:
    Department1:
      - Team1
  BU2:
    - Department2
    - Department3
BU1, Department1, BU2 are stored in lower case. This is because Fabric CA uses Viper to read configuration. Viper treats map keys as case insensitive and always returns lowercase value. To register an identity with Team1 affiliation, bu1.department1.Team1 would need to be specified to the –id.affiliation flag as shown below:
export FABRIC_CA_CLIENT_HOME=$HOME/fabric-ca/clients/admin
fabric-ca-client register --id.name client1 --id.type client --id.affiliation bu1.department1.Team1
Enrolling a peer identity
Now that you have successfully registered a peer identity, you may now enroll the peer given the enrollment ID and secret (i.e. the password from the previous section). This is similar to enrolling the bootstrap identity except that we also demonstrate how to use the “-M” option to populate the Hyperledger Fabric MSP (Membership Service Provider) directory structure.
The following command enrolls peer1. Be sure to replace the value of the “-M” option with the path to your peer’s MSP directory which is the ‘mspConfigPath’ setting in the peer’s core.yaml file. You may also set the FABRIC_CA_CLIENT_HOME to the home directory of your peer.
export FABRIC_CA_CLIENT_HOME=$HOME/fabric-ca/clients/peer1
fabric-ca-client enroll -u http://peer1:peer1pw@localhost:7054 -M $FABRIC_CA_CLIENT_HOME/msp
Enrolling an orderer is the same, except the path to the MSP directory is the ‘LocalMSPDir’ setting in your orderer’s orderer.yaml file.
All enrollment certificates issued by the fabric-ca-server have organizational units (or “OUs” for short) as follows:
- The root of the OU hierarchy equals the identity type
- An OU is added for each component of the identity’s affiliation
For example, if an identity is of type peer and its affiliation is department1.team1, the identity’s OU hierarchy (from leaf to root) is OU=team1, OU=department1, OU=peer.
Getting Identity Mixer credential
Identity Mixer (Idemix) is a cryptographic protocol suite for privacy-preserving authentication and transfer of certified attributes. Idemix allows clients to authenticate with verifiers without the involvement of the issuer (CA) and selectively disclose only those attributes that are required by the verifier and can do so without being linkable across their transactions.
Fabric CA server can issue Idemix credentials in addition to X509 certificates. An Idemix credential can be requested by sending the request to
the /api/v1/idemix/credential API endpoint. For more information on this and other Fabric CA server API endpoints, please refer to
swagger-fabric-ca.json.
The Idemix credential issuance is a two step process. First, send a request with an empty body to the /api/v1/idemix/credential
API endpoint to get a nonce and CA’s Idemix public key. Second, create a credential request using the nonce and CA’s Idemix public key and
send another request with the credential request in the body to the /api/v1/idemix/credential API endpoint to get an Idemix credential,
Credential Revocation Information (CRI), and attribute names and values. Currently, only three attributes are supported:
- OU - organization unit of the identity. The value of this attribute is set to identity’s affiliation. For example, if identity’s affiliation is dept1.unit1, then OU attribute is set to dept1.unit1
- IsAdmin - if the identity is an admin or not. The value of this attribute is set to the value of isAdmin registration attribute.
- EnrollmentID - enrollment ID of the identity
You can refer to the handleIdemixEnroll function in https://github.com/hyperledger/fabric-ca/blob/master/lib/client.go for reference implementation of the two step process for getting Idemix credential.
The /api/v1/idemix/credential API endpoint accepts both basic and token authorization headers. The basic authorization header should
contain User’s registration ID and password. If the identity already has X509 enrollment certificate, it can also be used to create a token authorization header.
Note that Hyperledger Fabric will support clients to sign transactions with both X509 and Idemix credentials, but will only support X509 credentials for peer and orderer identities. As before, applications can use a Fabric SDK to send requests to the Fabric CA server. SDKs hide the complexity associated with creating authorization header and request payload, and with processing the response.
Getting Idemix CRI (Certificate Revocation Information)
An Idemix CRI (Credential Revocation Information) is similar in purpose to an X509 CRL (Certificate Revocation List): to revoke what was previously issued. However, there are some differences.
In X509, the issuer revokes an end user’s certificate and its ID is included in the CRL. The verifier checks to see if the user’s certificate is in the CRL and if so, returns an authorization failure. The end user is not involved in this revocation process, other than receiving an authorization error from a verifier.
In Idemix, the end user is involved. The issuer revokes an end user’s credential similar to X509 and evidence of this
revocation is recorded in the CRI. The CRI is given to the end user (aka “prover”). The end user then generates a
proof that their credential has not been revoked according to the CRI. The end user gives this proof to the verifier
who verifies the proof according to the CRI.
For verification to succeed, the version of the CRI (known as the “epoch”) used by the end user and verifier must be same.
The latest CRI can be requested by sending a request to /api/v1/idemix/cri API endpoint.
The version of the CRI is incremented when an enroll request is received by the fabric-ca-server and there are no revocation
handles remaining in the revocation handle pool. In this case, the fabric-ca-server must generate a new pool of revocation
handles which increments the epoch of the CRI. The number of revocation handles in the revocation handle pool is configurable
via the idemix.rhpoolsize server configuration property.
Reenrolling an identity
Suppose your enrollment certificate is about to expire or has been compromised. You can issue the reenroll command to renew your enrollment certificate as follows.
export FABRIC_CA_CLIENT_HOME=$HOME/fabric-ca/clients/peer1
fabric-ca-client reenroll
Revoking a certificate or identity
An identity or a certificate can be revoked. Revoking an identity will revoke all the certificates owned by the identity and will also prevent the identity from getting any new certificates. Revoking a certificate will invalidate a single certificate.
In order to revoke a certificate or an identity, the calling identity must have
the hf.Revoker and hf.Registrar.Roles attribute. The revoking identity
can only revoke a certificate or an identity that has an affiliation that is
equal to or prefixed by the revoking identity’s affiliation. Furthermore, the
revoker can only revoke identities with types that are listed in the revoker’s
hf.Registrar.Roles attribute.
For example, a revoker with affiliation orgs.org1 and ‘hf.Registrar.Roles=peer,client’ attribute can revoke either a peer or client type identity affiliated with orgs.org1 or orgs.org1.department1 but can’t revoke an identity affiliated with orgs.org2 or of any other type.
The following command disables an identity and revokes all of the certificates associated with the identity. All future requests received by the Fabric CA server from this identity will be rejected.
fabric-ca-client revoke -e <enrollment_id> -r <reason>
The following are the supported reasons that can be specified using -r flag:
- unspecified
- keycompromise
- cacompromise
- affiliationchange
- superseded
- cessationofoperation
- certificatehold
- removefromcrl
- privilegewithdrawn
- aacompromise
For example, the bootstrap admin who is associated with root of the affiliation tree can revoke peer1‘s identity as follows:
export FABRIC_CA_CLIENT_HOME=$HOME/fabric-ca/clients/admin
fabric-ca-client revoke -e peer1
An enrollment certificate that belongs to an identity can be revoked by specifying its AKI (Authority Key Identifier) and serial number as follows:
fabric-ca-client revoke -a xxx -s yyy -r <reason>
For example, you can get the AKI and the serial number of a certificate using the openssl command
and pass them to the revoke command to revoke the said certificate as follows:
serial=$(openssl x509 -in userecert.pem -serial -noout | cut -d "=" -f 2)
aki=$(openssl x509 -in userecert.pem -text | awk '/keyid/ {gsub(/ *keyid:|:/,"",$1);print tolower($0)}')
fabric-ca-client revoke -s $serial -a $aki -r affiliationchange
The –gencrl flag can be used to generate a CRL (Certificate Revocation List) that contains all the revoked certificates. For example, following command will revoke the identity peer1, generates a CRL and stores it in the <msp folder>/crls/crl.pem file.
fabric-ca-client revoke -e peer1 --gencrl
A CRL can also be generated using the gencrl command. Refer to the Generating a CRL (Certificate Revocation List) section for more information on the gencrl command.
Generating a CRL (Certificate Revocation List)
After a certificate is revoked in the Fabric CA server, the appropriate MSPs in Hyperledger Fabric must also be updated.
This includes both local MSPs of the peers as well as MSPs in the appropriate channel configuration blocks.
To do this, PEM encoded CRL (certificate revocation list) file must be placed in the crls
folder of the MSP. The fabric-ca-client gencrl command can be used to generate a CRL. Any identity
with hf.GenCRL attribute can create a CRL that contains serial numbers of all certificates that were revoked
during a certain period. The created CRL is stored in the <msp folder>/crls/crl.pem file.
The following command will create a CRL containing all the revoked certficates (expired and unexpired) and store the CRL in the ~/msp/crls/crl.pem file.
export FABRIC_CA_CLIENT_HOME=~/clientconfig
fabric-ca-client gencrl -M ~/msp
The next command will create a CRL containing all certificates (expired and unexpired) that were revoked after 2017-09-13T16:39:57-08:00 (specified by the –revokedafter flag) and before 2017-09-21T16:39:57-08:00 (specified by the –revokedbefore flag) and store the CRL in the ~/msp/crls/crl.pem file.
export FABRIC_CA_CLIENT_HOME=~/clientconfig
fabric-ca-client gencrl --caname "" --revokedafter 2017-09-13T16:39:57-08:00 --revokedbefore 2017-09-21T16:39:57-08:00 -M ~/msp
The –caname flag specifies the name of the CA to which this request is sent. In this example, the gencrl request is sent to the default CA.
The –revokedafter and –revokedbefore flags specify the lower and upper boundaries of a time period. The generated CRL will contain certificates that were revoked in this time period. The values must be UTC timestamps specified in RFC3339 format. The –revokedafter timestamp cannot be greater than the –revokedbefore timestamp.
By default, ‘Next Update’ date of the CRL is set to next day. The crl.expiry CA configuration property can be used to specify a custom value.
The gencrl command will also accept –expireafter and –expirebefore flags that can be used to generate a CRL with revoked certificates that expire during the period specified by these flags. For example, the following command will generate a CRL that contains certificates that were revoked after 2017-09-13T16:39:57-08:00 and before 2017-09-21T16:39:57-08:00, and that expire after 2017-09-13T16:39:57-08:00 and before 2018-09-13T16:39:57-08:00
export FABRIC_CA_CLIENT_HOME=~/clientconfig
fabric-ca-client gencrl --caname "" --expireafter 2017-09-13T16:39:57-08:00 --expirebefore 2018-09-13T16:39:57-08:00  --revokedafter 2017-09-13T16:39:57-08:00 --revokedbefore 2017-09-21T16:39:57-08:00 -M ~/msp
Enabling TLS
This section describes in more detail how to configure TLS for a Fabric CA client.
The following sections may be configured in the fabric-ca-client-config.yaml.
tls:
  # Enable TLS (default: false)
  enabled: true
  certfiles:
    - root.pem
  client:
    certfile: tls_client-cert.pem
    keyfile: tls_client-key.pem
The certfiles option is the set of root certificates trusted by the client. This will typically just be the root Fabric CA server’s certificate found in the server’s home directory in the ca-cert.pem file.
The client option is required only if mutual TLS is configured on the server.
Attribute-Based Access Control
Access control decisions can be made by chaincode (and by the Hyperledger Fabric runtime) based upon an identity’s attributes. This is called Attribute-Based Access Control, or ABAC for short.
In order to make this possible, an identity’s enrollment certificate (ECert) may contain one or more attribute name and value. The chaincode then extracts an attribute’s value to make an access control decision.
For example, suppose that you are developing application app1 and want a particular chaincode operation to be accessible only by app1 administrators. Your chaincode could verify that the caller’s certificate (which was issued by a CA trusted for the channel) contains an attribute named app1Admin with a value of true. Of course the name of the attribute can be anything and the value need not be a boolean value.
So how do you get an enrollment certificate with an attribute? There are two methods:
When you register an identity, you can specify that an enrollment certificate issued for the identity should by default contain an attribute. This behavior can be overridden at enrollment time, but this is useful for establishing default behavior and, assuming registration occurs outside of your application, does not require any application change.
The following shows how to register user1 with two attributes: app1Admin and email. The ”:ecert” suffix causes the appAdmin attribute to be inserted into user1’s enrollment certificate by default, when the user does not explicitly request attributes at enrollment time. The email attribute is not added to the enrollment certificate by default.
fabric-ca-client register --id.name user1 --id.secret user1pw --id.type client --id.affiliation org1 --id.attrs 'app1Admin=true:ecert,email=user1@gmail.com'
When you enroll an identity, you may explicitly request that one or more attributes be added to the certificate. For each attribute requested, you may specify whether the attribute is optional or not. If it is not requested optionally and the identity does not possess the attribute, an error will occur.
The following shows how to enroll user1 with the email attribute, without the app1Admin attribute, and optionally with the phone attribute (if the user possesses the phone attribute).
fabric-ca-client enroll -u http://user1:user1pw@localhost:7054 --enrollment.attrs "email,phone:opt"
The table below shows the three attributes which are automatically registered for every identity.
| Attribute Name | Attribute Value |
|---|---|
| hf.EnrollmentID | The enrollment ID of the identity |
| hf.Type | The type of the identity |
| hf.Affiliation | The affiliation of the identity |
To add any of the above attributes by default to a certificate, you must explicitly register the attribute with the ”:ecert” specification. For example, the following registers identity ‘user1’ so that the ‘hf.Affiliation’ attribute will be added to an enrollment certificate if no specific attributes are requested at enrollment time. Note that the value of the affiliation (which is ‘org1’) must be the same in both the ‘–id.affiliation’ and the ‘–id.attrs’ flags.
fabric-ca-client register --id.name user1 --id.secret user1pw --id.type client --id.affiliation org1 --id.attrs 'hf.Affiliation=org1:ecert'
For information on the chaincode library API for Attribute-Based Access Control, see https://github.com/hyperledger/fabric/blob/release-1.4/core/chaincode/lib/cid/README.md
Dynamic Server Configuration Update
This section describes how to use fabric-ca-client to dynamically update portions of the fabric-ca-server’s configuration without restarting the server.
All commands in this section require that you first be enrolled by executing the fabric-ca-client enroll command.
Dynamically updating identities
This section describes how to use fabric-ca-client to dynamically update identities.
An authorization failure will occur if the client identity does not satisfy all of the following:
- The client identity must possess the “hf.Registrar.Roles” attribute with a comma-separated list of values where one of the values equals the type of identity being updated; for example, if the client’s identity has the “hf.Registrar.Roles” attribute with a value of “client”, the client can update identities of type ‘client’, but not ‘peer’.
- The affiliation of the client’s identity must be equal to or a prefix of the affiliation of the identity being updated. For example, a client with an affiliation of “a.b” may update an identity with an affiliation of “a.b.c” but may not update an identity with an affiliation of “a.c”. If root affiliation is required for an identity, then the update request should specify a dot (”.”) for the affiliation and the client must also have root affiliation.
The following shows how to add, modify, and remove an affiliation.
Getting Identity Information
A caller may retrieve information on a identity from the fabric-ca server as long as the caller meets the authorization requirements highlighted in the section above. The following command shows how to get an identity.
fabric-ca-client identity list --id user1
A caller may also request to retrieve information on all identities that it is authorized to see by issuing the following command.
fabric-ca-client identity list
Adding an identity
The following adds a new identity for ‘user1’. Adding a new identity performs the same action as registering an identity via the ‘fabric-ca-client register’ command. There are two available methods for adding a new identity. The first method is via the –json flag where you describe the identity in a JSON string.
fabric-ca-client identity add user1 --json '{"secret": "user1pw", "type": "client", "affiliation": "org1", "max_enrollments": 1, "attrs": [{"name": "hf.Revoker", "value": "true"}]}'
The following adds a user with root affiliation. Note that an affiliation name of ”.” means the root affiliation.
fabric-ca-client identity add user1 --json '{"secret": "user1pw", "type": "client", "affiliation": ".", "max_enrollments": 1, "attrs": [{"name": "hf.Revoker", "value": "true"}]}'
The second method for adding an identity is to use direct flags. See the example below for adding ‘user1’.
fabric-ca-client identity add user1 --secret user1pw --type client --affiliation . --maxenrollments 1 --attrs hf.Revoker=true
The table below lists all the fields of an identity and whether they are required or optional, and any default values they might have.
| Fields | Required | Default Value |
|---|---|---|
| ID | Yes | |
| Secret | No | |
| Affiliation | No | Caller’s Affiliation |
| Type | No | client |
| Maxenrollments | No | 0 |
| Attributes | No |
Modifying an identity
There are two available methods for modifying an existing identity. The first method is via the –json flag where you describe the modifications in to an identity in a JSON string. Multiple modifications can be made in a single request. Any element of an identity that is not modified will retain its original value.
NOTE: A maxenrollments value of “-2” specifies that the CA’s max enrollment setting is to be used.
The command below make multiple modification to an identity using the –json flag.
fabric-ca-client identity modify user1 --json '{"secret": "newPassword", "affiliation": ".", "attrs": [{"name": "hf.Regisrar.Roles", "value": "peer,client"},{"name": "hf.Revoker", "value": "true"}]}'
The commands below make modifications using direct flags. The following updates the enrollment secret (or password) for identity ‘user1’ to ‘newsecret’.
fabric-ca-client identity modify user1 --secret newsecret
The following updates the affiliation of identity ‘user1’ to ‘org2’.
fabric-ca-client identity modify user1 --affiliation org2
The following updates the type of identity ‘user1’ to ‘peer’.
fabric-ca-client identity modify user1 --type peer
The following updates the maxenrollments of identity ‘user1’ to 5.
fabric-ca-client identity modify user1 --maxenrollments 5
By specifying a maxenrollments value of ‘-2’, the following causes identity ‘user1’ to use the CA’s max enrollment setting.
fabric-ca-client identity modify user1 --maxenrollments -2
The following sets the value of the ‘hf.Revoker’ attribute for identity ‘user1’ to ‘false’. If the identity has other attributes, they are not changed. If the identity did not previously possess the ‘hf.Revoker’ attribute, the attribute is added to the identity. An attribute may also be removed by specifying no value for the attribute.
fabric-ca-client identity modify user1 --attrs hf.Revoker=false
The following removes the ‘hf.Revoker’ attribute for user ‘user1’.
fabric-ca-client identity modify user1 --attrs hf.Revoker=
The following demonstrates that multiple options may be used in a single fabric-ca-client identity modify command. In this case, both the secret and the type are updated for user ‘user1’.
fabric-ca-client identity modify user1 --secret newpass --type peer
Removing an identity
The following removes identity ‘user1’ and also revokes any certificates associated with the ‘user1’ identity.
fabric-ca-client identity remove user1
Note: Removal of identities is disabled in the fabric-ca-server by default, but may be enabled by starting the fabric-ca-server with the –cfg.identities.allowremove option.
Dynamically updating affiliations
This section describes how to use fabric-ca-client to dynamically update affiliations. The following shows how to add, modify, remove, and list an affiliation.
Adding an affiliation
An authorization failure will occur if the client identity does not satisfy all of the following:
- The client identity must possess the attribute ‘hf.AffiliationMgr’ with a value of ‘true’.
- The affiliation of the client identity must be hierarchically above the affiliation being updated. For example, if the client’s affiliation is “a.b”, the client may add affiliation “a.b.c” but not “a” or “a.b”.
The following adds a new affiliation named ‘org1.dept1’.
fabric-ca-client affiliation add org1.dept1
Modifying an affiliation
An authorization failure will occur if the client identity does not satisfy all of the following:
- The client identity must possess the attribute ‘hf.AffiliationMgr’ with a value of ‘true’.
- The affiliation of the client identity must be hierarchically above the affiliation being updated. For example, if the client’s affiliation is “a.b”, the client may add affiliation “a.b.c” but not “a” or “a.b”.
- If the ‘–force’ option is true and there are identities which must be modified, the client identity must also be authorized to modify the identity.
The following renames the ‘org2’ affiliation to ‘org3’. It also renames any sub affiliations (e.g. ‘org2.department1’ is renamed to ‘org3.department1’).
fabric-ca-client affiliation modify org2 --name org3
If there are identities that are affected by the renaming of an affiliation, it will result in an error unless the ‘–force’ option is used. Using the ‘–force’ option will update the affiliation of identities that are affected to use the new affiliation name.
fabric-ca-client affiliation modify org1 --name org2 --force
Removing an affiliation
An authorization failure will occur if the client identity does not satisfy all of the following:
- The client identity must possess the attribute ‘hf.AffiliationMgr’ with a value of ‘true’.
- The affiliation of the client identity must be hierarchically above the affiliation being updated. For example, if the client’s affiliation is “a.b”, the client may remove affiliation “a.b.c” but not “a” or “a.b”.
- If the ‘–force’ option is true and there are identities which must be modified, the client identity must also be authorized to modify the identity.
The following removes affiliation ‘org2’ and also any sub affiliations. For example, if ‘org2.dept1’ is an affiliation below ‘org2’, it is also removed.
fabric-ca-client affiliation remove org2
If there are identities that are affected by the removing of an affiliation, it will result in an error unless the ‘–force’ option is used. Using the ‘–force’ option will also remove all identities that are associated with that affiliation, and the certificates associated with any of these identities.
Note: Removal of affiliations is disabled in the fabric-ca-server by default, but may be enabled by starting the fabric-ca-server with the –cfg.affiliations.allowremove option.
Listing affiliation information
An authorization failure will occur if the client identity does not satisfy all of the following:
- The client identity must possess the attribute ‘hf.AffiliationMgr’ with a value of ‘true’.
- Affiliation of the client identity must be equal to or be hierarchically above the affiliation being updated. For example, if the client’s affiliation is “a.b”, the client may get affiliation information on “a.b” or “a.b.c” but not “a” or “a.c”.
The following command shows how to get a specific affiliation.
fabric-ca-client affiliation list --affiliation org2.dept1
A caller may also request to retrieve information on all affiliations that it is authorized to see by issuing the following command.
fabric-ca-client affiliation list
Manage Certificates
This section describes how to use fabric-ca-client to manage certificates.
Listing certificate information
The certificates that are visible to a caller include:
- Those certificates which belong to the caller
- If the caller possesses the
hf.Registrar.Rolesattribute or thehf.Revokerattribute with a value oftrue, all certificates which belong to identities in and below the caller’s affiliation. For example, if the client’s affiliation isa.b, the client may get certificates for identities who’s affiliation isa.bora.b.cbut notaora.c.
If executing a list command that requests certificates of more than one identity, only certificates of identities with an affiliation that is equal to or hierarchically below the caller’s affiliation will be listed.
The certificates which will be listed may be filtered based on ID, AKI, serial number, expiration time, revocation time, notrevoked, and notexpired flags.
id: List certificates for this enrollment IDserial: List certificates that have this serial numberaki: List certificates that have this AKIexpiration: List certificates that have expiration dates that fall within this expiration timerevocation: List certificates that were revoked within this revocation timenotrevoked: List certificates that have not yet been revokednotexpired: List certificates that have not yet expired
You can use flags notexpired and notrevoked as filters to exclude revoked certificates and/or expired certificates from the result set.
For example, if you only care about certificates that have expired but have not been revoked you can use the expiration and notrevoked flags to
get back such results. An example of this case is provided below.
Time should be specified based on RFC3339. For instance, to list certificates that have expirations between March 1, 2018 at 1:00 PM and June 15, 2018 at 2:00 AM, the input time string would look like 2018-03-01T13:00:00z and 2018-06-15T02:00:00z. If time is not a concern, and only the dates matter, then the time part can be left off and then the strings become 2018-03-01 and 2018-06-15.
The string now may be used to denote the current time and the empty string to denote any time. For example, now:: denotes
a time range from now to any time in the future, and ::now denotes a time range from any time in the past until now.
The following command shows how to list certificates using various filters.
List all certificates:
fabric-ca-client certificate list
List all certificates by id:
fabric-ca-client certificate list --id admin
List certificate by serial and aki:
fabric-ca-client certificate list --serial 1234 --aki 1234
List certificate by id and serial/aki:
fabric-ca-client certificate list --id admin --serial 1234 --aki 1234
List certificates that are neither revoker nor expired by id:
fabric-ca-client certificate list --id admin --notrevoked --notexpired
List all certificates that have not been revoked for an id (admin):
fabric-ca-client certificate list --id admin --notrevoked
List all certificates have not expired for an id (admin):
The “–notexpired” flag is equivalent to “–expiration now::”, which means certificates will expire some time in the future.
fabric-ca-client certificate list --id admin --notexpired
List all certificates that were revoked between a time range for an id (admin):
fabric-ca-client certificate list --id admin --revocation 2018-01-01T01:30:00z::2018-01-30T05:00:00z
List all certificates that were revoked between a time range but have not expired for an id (admin):
fabric-ca-client certificate list --id admin --revocation 2018-01-01::2018-01-30 --notexpired
List all revoked certificates using duration (revoked between 30 days and 15 days ago) for an id (admin):
fabric-ca-client certificate list --id admin --revocation -30d::-15d
List all revoked certificates before a time
fabric-ca-client certificate list --revocation ::2018-01-30
List all revoked certificates after a time
fabric-ca-client certificate list --revocation 2018-01-30::
List all revoked certificates before now and after a certain date
fabric-ca-client certificate list --id admin --revocation 2018-01-30::now
List all certificate that expired between a time range but have not been revoked for an id (admin):
fabric-ca-client certificate list --id admin --expiration 2018-01-01::2018-01-30 --notrevoked
List all expired certificates using duration (expired between 30 days and 15 days ago) for an id (admin):
fabric-ca-client certificate list --expiration -30d::-15d
List all certificates that have expired or will expire before a certain time
fabric-ca-client certificate list --expiration ::2058-01-30
List all certificates that have expired or will expire after a certain time
fabric-ca-client certificate list --expiration 2018-01-30::
List all expired certificates before now and after a certain date
fabric-ca-client certificate list --expiration 2018-01-30::now
List certificates expiring in the next 10 days:
fabric-ca-client certificate list --id admin --expiration ::+10d --notrevoked
The list certificate command can also be used to store certificates on the file system. This is a convenient way to populate the admins folder in an MSP, The “-store” flag points to the location on the file system to store the certificates.
Configure an identity to be an admin, by storing certificates for an identity in the MSP:
export FABRIC_CA_CLIENT_HOME=/tmp/clientHome
fabric-ca-client certificate list --id admin --store msp/admincerts
Contact specific CA instance
When a server is running multiple CA instances, requests can be directed to a
specific CA. By default, if no CA name is specified in the client request the
request will be directed to the default CA on the fabric-ca server. A CA name
can be specified on the command line of a client command using the caname
filter as follows:
fabric-ca-client enroll -u http://admin:adminpw@localhost:7054 --caname <caname>
Configuring an HSM
By default, the Fabric CA server and client store private keys in a PEM-encoded file, but they can also be configured to store private keys in an HSM (Hardware Security Module) via PKCS11 APIs. This behavior is configured in the BCCSP (BlockChain Crypto Service Provider) section of the server’s or client’s configuration file. Currently, Fabric only supports the PKCS11 standard to communicate with an HSM.
Example
The following example demonstrates how to configure the Fabric CA server or client to use a software version of PKCS11 called SoftHSM (see https://github.com/opendnssec/SoftHSMv2).
After installing SoftHSM, make sure to set your SOFTHSM2_CONF environment variable to point to the location where the SoftHSM2 configuration file is stored. The config file looks like
directories.tokendir = /tmp/
objectstore.backend = file
log.level = INFO
You can find example configuration file named SoftHSM2.conf under testdata directory.
Create a token, label it “ForFabric”, set the pin to ‘98765432’ (refer to SoftHSM documentation).
You can use both the config file and environment variables to configure BCCSP. For example, set the bccsp section of Fabric CA server configuration file as follows. Note that the default field’s value is PKCS11.
#############################################################################
# BCCSP (BlockChain Crypto Service Provider) section is used to select which
# crypto library implementation to use
#############################################################################
bccsp:
  default: PKCS11
  pkcs11:
    Library: /usr/local/Cellar/softhsm/2.1.0/lib/softhsm/libsofthsm2.so
    Pin: 98765432
    Label: ForFabric
    hash: SHA2
    security: 256
    filekeystore:
      # The directory used for the software file-based keystore
      keystore: msp/keystore
And you can override relevant fields via environment variables as follows:
FABRIC_CA_SERVER_BCCSP_DEFAULT=PKCS11
FABRIC_CA_SERVER_BCCSP_PKCS11_LIBRARY=/usr/local/Cellar/softhsm/2.1.0/lib/softhsm/libsofthsm2.so
FABRIC_CA_SERVER_BCCSP_PKCS11_PIN=98765432
FABRIC_CA_SERVER_BCCSP_PKCS11_LABEL=ForFabric
The prebuilt Hyperledger Fabric Docker images are not enabled to use PKCS11. If you are deploying the Fabric CA using Docker, you need to build your own image and enable PKCS11 using the following command:
make docker GO_TAGS=pkcs11
You also need to ensure that the PKCS11 library is available to be used by the CA by installing it or mounting it inside the container. If you are deploying your Fabric CA using Docker Compose, you can update your Compose files to mount the SoftHSM library and configuration file inside the container using volumes. As an example, you would add the following environment and volumes variables to your Docker Compose file:
environment:
   - SOFTHSM2_CONF=/etc/hyperledger/fabric/config.file
volumes:
   - /home/softhsm/config.file:/etc/hyperledger/fabric/config.file
   - /usr/local/Cellar/softhsm/2.1.0/lib/softhsm/libsofthsm2.so:/etc/hyperledger/fabric/libsofthsm2.so
File Formats
Fabric CA server’s configuration file format
A default configuration file is created in the server’s home directory (see Fabric CA Server section for more info). The following link shows a sample Server configuration file.
Fabric CA client’s configuration file format
A default configuration file is created in the client’s home directory (see Fabric CA Client section for more info). The following link shows a sample Client configuration file.
Troubleshooting
If you see a
Killed: 9error on OSX when trying to executefabric-ca-clientorfabric-ca-server, there is a long thread describing this problem at https://github.com/golang/go/issues/19734. The short answer is that to work around this issue, you can run the following command:# sudo ln -s /usr/bin/true /usr/local/bin/dsymutilThe error
[ERROR] No certificates found for provided serial and akiwill occur if the following sequence of events occurs:- You issue a fabric-ca-client enroll command, creating an enrollment certificate (i.e. an ECert). This stores a copy of the ECert in the fabric-ca-server’s database.
- The fabric-ca-server’s database is deleted and recreated, thus losing the ECert from step ‘a’. For example, this may happen if you stop and restart a Docker container hosting the fabric-ca-server, but your fabric-ca-server is using the default sqlite database and the database file is not stored on a volume and is therefore not persistent.
- You issue a fabric-ca-client register command or any other command which tries to use the ECert from
step ‘a’. In this case, since the database no longer contains the ECert, the
[ERROR] No certificates found for provided serial and akiwill occur.
To resolve this error, you must enroll again by repeating step ‘a’. This will issue a new ECert which will be stored in the current database.
When sending multiple parallel requests to a Fabric CA Server cluster that uses shared sqlite3 databases, the server occasionally returns a ‘database locked’ error. This is most probably because the database transaction timed out while waiting for database lock (held by another cluster member) to be released. This is an invalid configuration because sqlite is an embedded database, which means the Fabric CA server cluster must share the same file via a shared file system, which introduces a SPoF (single point of failure), which contradicts the purpose of cluster topology. The best practice is to use either Postgres or MySQL databases in a cluster topology.
Suppose an error similar to
Failed to deserialize creator identity, err The supplied identity is not valid, Verify() returned x509: certificate signed by unknown authorityis returned by a peer or orderer when using an enrollment certificate issued by the Fabric CA Server. This indicates that the signing CA certificate used by the Fabric CA Server to issue certificates does not match a certificate in the cacerts or intermediatecerts folder of the MSP used to make authorization checks.The MSP which is used to make authorization checks depends on which operation you were performing when the error occurred. For example, if you were trying to install chaincode on a peer, the local MSP on the file system of the peer is used; otherwise, if you were performing some channel specific operation such as instantiating chaincode on a specific channel, the MSP in the genesis block or the most recent configuration block of the channel is used.
To confirm that this is the problem, compare the AKI (Authority Key Identifier) of the enrollment certificate to the SKI (Subject Key Identifier) of the certificate(s) in the cacerts and intermediatecerts folder of appropriate MSP. The command openssl x509 -in <PEM-file> -noout -text | grep -A1 “Authority Key Identifier” will display the AKI and openssl x509 -in <PEM-file> -noout -text | grep -A1 “Subject Key Identifier” will display the SKI. If they are not equal, you have confirmed that this is the cause of the error.
This can happen for multiple reasons including:
You used cryptogen to generate your key material but did not start fabric-ca-server with the signing key and certificate generated by cryptogen.
To resolve (assuming FABRIC_CA_SERVER_HOME is set to the home directory of your fabric-ca-server):
- Stop fabric-ca-server.
- Copy crypto-config/peerOrganizations/<orgName>/ca/*pem to $FABRIC_CA_SERVER_HOME/ca-cert.pem.
- Copy crypto-config/peerOrganizations/<orgName>/ca/*_sk to $FABRIC_CA_SERVER_HOME/msp/keystore/.
- Start fabric-ca-server.
- Delete any previously issued enrollment certificates and get new certificates by enrolling again.
You deleted and recreated the CA signing key and certificate used by the Fabric CA Server after generating the genesis block. This can happen if the Fabric CA Server is running in a Docker container, the container was restarted, and its home directory is not on a volume mount. In this case, the Fabric CA Server will create a new CA signing key and certificate.
Assuming that you can not recover the original CA signing key, the only way to recover from this scenario is to update the certificate in the cacerts (or intermediatecerts) of the appropriate MSPs to the new CA certificate.